Identifying JDdeveloper Version
Let us see how to identify the
JDeveloper for the Oracle Apps Instance Version.
Step 1: If we observe we will find an option called “About this
Page” in OAF Page. Click on the link About this Page. The same process is shown
in the below figure:
pic1:

Sometimes you may not find an option
called About this Page, for that you need to set one Profile Option in Oracle
Apps. The name of the profile option is “Personalize Self-Service Defn”. Switch
to the responsibility, System Administrator.
The navigation to select the profile
option is: System Administrator -> Profile -> System
pic2:

After that select the Display level as Site and down in the Profile give name like “Persolalize%Self%”, the same scenario is shown in the below figure:
pic3:

After entering, click on Find button
then you can see full profile option name. At site level select YES
option to activate About this Page link in the Oracle apps Framework page. The
same scenario is shown in the below figure:
pic4:

Step 2: After selecting About This page we can see another window, in that select a tab called “Technology Components” and after selecting that tab we can see the option called OAFramework which shows the version name of OAFramework. The same scenario is shown in the below figure which is showing the version number as 12.1.3.
pic5:

Step 3: Now you need to
download the JDeveloper patch of the version which we identified in Technology
Components. All the patches we can download from Oracle Meta link, and the file
size is 500+ MB. The below table lists some patches related to the versions:
Oracle
Apps Release Version
|
JDeveloper
Patch
|
12.1.0
|
Patch
7315332
|
12.1.1
|
Patch
8431482
|
12.1.2
|
Patch
9172975
|
12.1.3
|
Patch
9879989
|
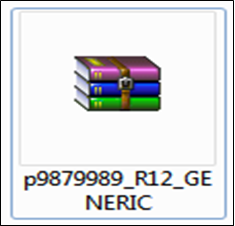
The below picture shows the patch of
the version 12.1.3:-
pic6:
Extract the ZIP file and open the patch folder you will find three folders, as shown in the below figure contains jdevbin, jdevdoc, jdevhome:
Copy the extracted folder into D:/ drive.
pic7:

Installation Process of JDeveloper
There is no .exe file to install in Windows, just we need to get the jdevbin>jdev>src>jdev file as shortcut our desktop
Let us see the installation process
of JDeveloper, after opening the un zipped file you will find three folder
called jdevbin, jdevhome, jdevdoc, the below figure shows the same scenario:
In the next step open jdevbin folder
in that you will find a jdev folder again open jdev folder the you can see bin
folder, after that if you observe we can find jdev and jdevW icons. The jdev is
for UNIX environment and jdevW is for Windows environment. The same scenario is
shown in the below figure stepwise:
pic8:

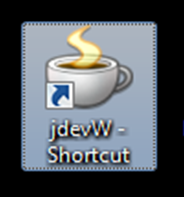
Now send a shortcut of jdevW to
desktop .
The below figure shows the same
scenario, have a look into it:
pic9:

Now you can see the shortcut of
JDeveloper directly on Desktop
pic10:
Now you can see the shortcut of
JDeveloper directly on Desktop
pic11:

Select Advanced System Settings after choosing the Properties of Computer, the same scenario is shown in the below figure:
pic12:
 Now in the top User Variables select New Button for adding a New User variable
as show in the below figure:
Now in the top User Variables select New Button for adding a New User variable
as show in the below figure:
pic13:

pic14:

Note that you must give Variable
name as “JDEV_USER_HOME” and Variable Value is the path of
the jdevhome\jdev. Let us consider as a example I downloaded the patch and
extracted it to Bharath\Softwares in D: drive now my path for Variable
value is:
D:\Bharath\Softwares\p9879989_R12_GENERIC\jdevhome\jdev
The same thing is shown in the below figure:
pic15:

Step 2: After setting Variable name and Variable value we need to select DBC file into from Oracle Apps fnd top, copy DBC file and paste it in JDeveloper patch.
To know where exactly the DBC file
is located in Oracle Apps go to About this Page and select Java System
Properties tab then in the list we can find an System Property called DBC FILE,
in the Value behind to DBC FILE is the path where exactly the DBC file located
in the Oracle Apps.
The same scenario is shown in the below figure:
pic16:

Step 3: After finding where exactly the DBC file located go to that particular path and copy the DBC file (note that don’t delete the dbc file and also don’t cut it).
Here we are using WinScp which
connects to the server from our desktop system, we can also use putty to
connect to the server or any other tool which works similar like WinScp or
Putty connection manager.

copy the file .dbc from the Apps server and paste in your local folder of jdevhome>jdev>dbc_files>secure
You can also get the dbc file from front end using below steps:
1. http://xxcompany:8051/OA_HTML/jsp/fnd/aoljtest.jsp
2. Give your
Apps schema
Apps Pwd
SID
Hostname
Port
3. Once success, then AOL/J Test Page opens, go to the botom of the page, you will see alink called 'Enter AOL/J Setup Test' , click it
4. click Locate DBC file at the left side, dbc file text will appear at the right side copy it
and make file as vis.dbc and paste it under jdevhome>jdev>dbc_files>secure.
Step 4: After pasting the DBC file now open the JDeveloper and
create the Data Base Connection. After opening the file it will ask for
Configure File Type Associations, on check box check all the available types to
associate with JDeveloper. The below figure shows how the opening page
looks like:

Step 5: Create a data base connection, go to Connections tab after that Right Click on Data Base folder and then select New Database Connection…, the same scenario is shown in the below figure:

After
selecting New Database Connection… Welcome to the create Data Base connection
window opens simply click on Next button. After that give the Connection Name
here in the below figure if we observe the connection name is NewtonApples, and
the Connection Type must be Oracle (JDBC)
pic20:

Click
on next button after giving Connection Name, in the next window it asks for
username and password give Toad/Oracle SQL Developer tool connection name. The
same scenario is shown in the below figure:-
pic21:

After
giving Username and Password click on the Next button, now you need to give
connection details all the connection details we even can find in DBC file, to
check those detail open the DBC file with notepad there you can find Host Name
, JDBC Port, and Service Name. Give appropriate names and note that Driver type
is thin.
pic22:

Now after giving proper names click on the Next button we can find Test Connection button click on the Test Connection button to check the connection is success or not.
pic23:

Click Next button and then click
Finish button.
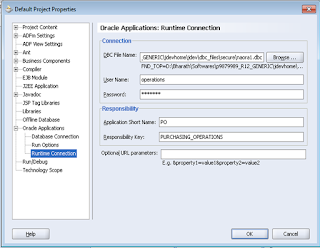
Step 6: This is the last step in JDeveloper configuration, set the JDeveloper default Project Properties. Go to Tools à Default Project Properties. The same scenario is shown in the below figure:
Step 6: This is the last step in JDeveloper configuration, set the JDeveloper default Project Properties. Go to Tools à Default Project Properties. The same scenario is shown in the below figure:
pic24:

After selecting Default Project
Properties… from Tools menu, in the highlighted Project Properties extract
Oracle Applications and select Run time Connection.
The same scenario is shown in the below figure:
pic25:

Now give the following details:
DBC File Name: Give the path where exactly the DBC File is stored which
actually we copied from server to our desktop system.
User Name: The user name is Oracle Apps instance User Name
Password: Password is Oracle Apps instance Password.
Application Short Name: Any application short name which user got access permit and
also note that whatever the application short name we are giving it must
contain at least one OAF page and also that must be attached to the
responsibility of the User Name which we are giving.
Responsibility Key: Responsibility key of the Application Short Name.
The below figure shows the example
showing DBC file path, User Name, Password, Application Short Name,
Responsibility Key. Just have a look into the picture.
pic26:
Finally click on OK button, so that
we finished our JDeveloper Configuration process.
Errors: If you are not able to connect the database then check the dbc file.
1. Check the Host Name, replace url with the ipaddress.
2. Check the port .
3. Save and open the jdev again.
No comments:
Post a Comment