Extensions in OAF
In this lesson we will see the different types of extensions in OAF (Oracle Apps Framework). We use extensions if we want to do any changes in the already shipped oracle E-Business suite. The main purpose we use extensions is to make changes in the already well designed Oracle E-Business suite pages.
We have two types of extensions
- BC4J Extensions
- CO Extension
BC4J Extensions are again divided into three types and they are:
- VO Extension
- AM Extension
- EO Extension
You can see in the further chapters how to create extensions in OAF and how the extensions will make changes in OAF.
VO Extension in OAF
In this lesson we are going to see how to extend the VO (View Object) in OAF (Oracle Applications Framework).
Before going to extent the VO let us understand the requirement first. Navigate to the Purchasing, Vision Operations (USA).
Purchasing, Vision Operations (USA) -> Supply Base -> Supplier User Management -> Supplier User Creation -> Register Supplier User.
The same navigation process is shown in the below image:-
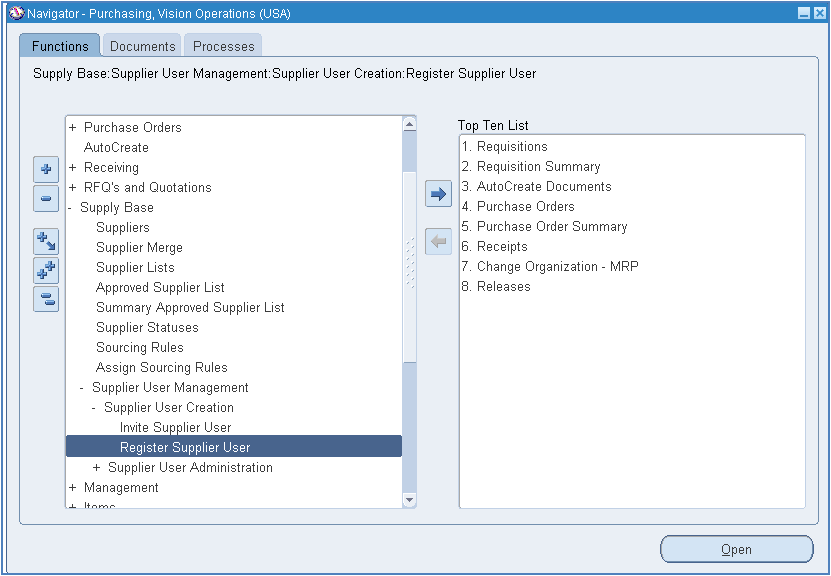
The same navigation process is shown in the below image:-
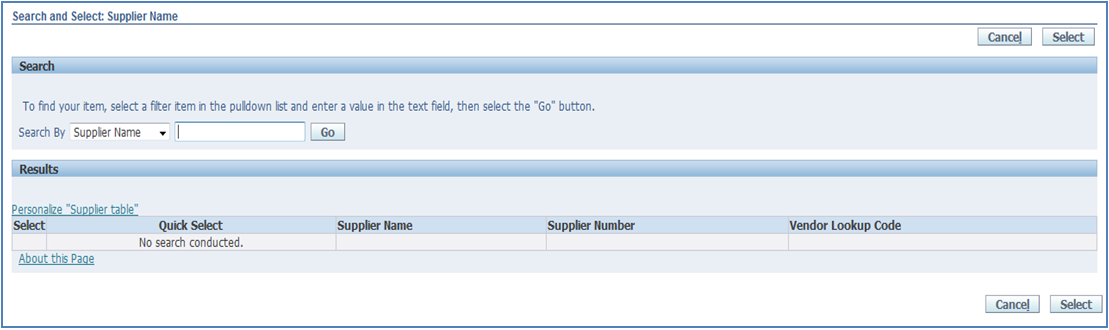
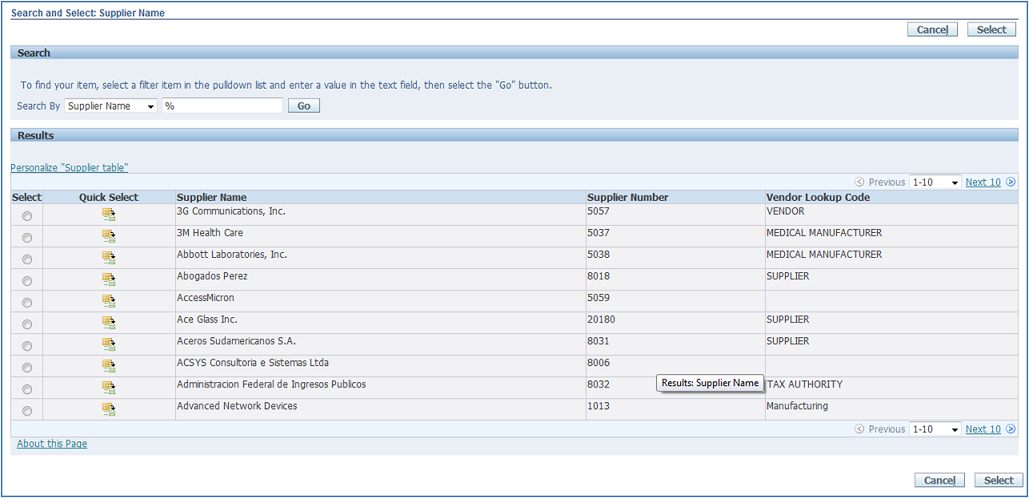
The below image shows the Register Supplier User OAF page which will appear once we select Register Supplier User option as discussed.

When we click on the Supplier Name search option (LOV) in the above page we will see Supplier Name and Supplier Number.
So therefore our task is to add Vendor Lookup Code additional column in the search list.
Using Customization we can add a column but we cannot carry data to that created column so therefore we need to go for extension if we want to carry data along with Supplier Name and Supplier Number. Hence we have to go for extension let us see how to extent and here the requirement is just to carry data and display it so therefore we know that using VO we can achieve it and hence no need to perform any DML operation like INSERT,UPDATE, DELETE.
Let us see the requirement step wise:
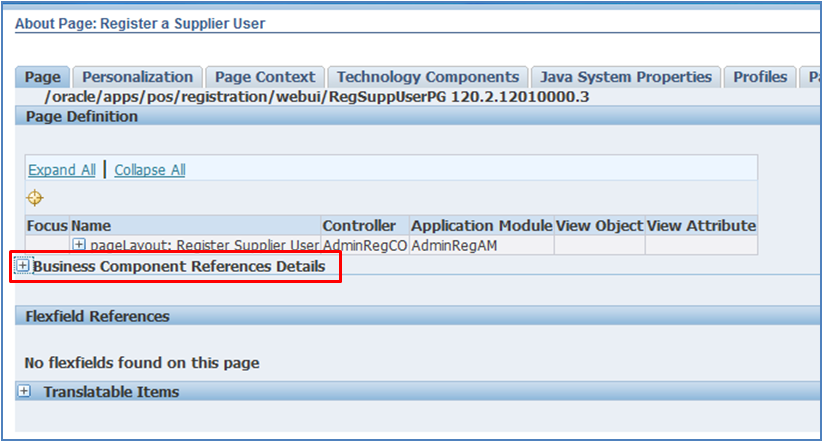
Step 1: Identify the VO from the page. It means first we need to identify which VO to be extend. Go to about this page and expand the “Business Component Reference Details”. For reference look at the below image:
Let us see the requirement step wise:
Step 1: Identify the VO from the page. It means first we need to identify which VO to be extend. Go to about this page and expand the “Business Component Reference Details”. For reference look at the below image:
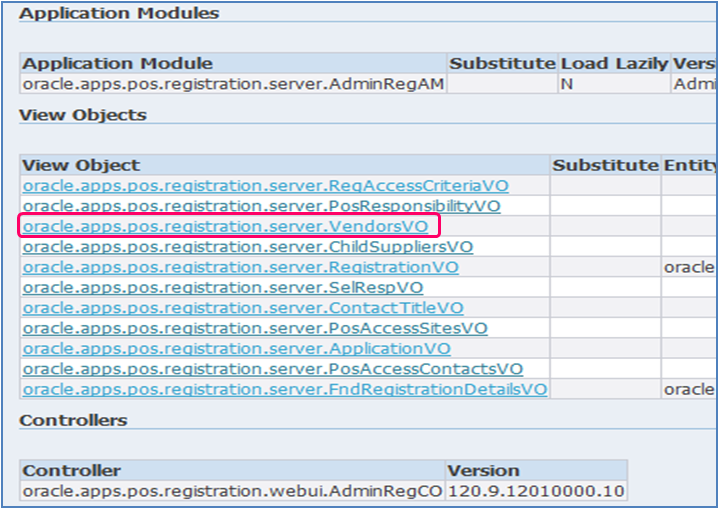
After that select VendorsVO as we know that supplier called as Vendors and their information stores in PO_VENDORS table. According to the naming convention VO ends with VO after name we can identify.
In any SSHR Pages, to find exactly the VO, Attribute Name, just download the Page (PG) from metadata and open it Jdev and view the field (vo, attribute).
metadata file path:
/ora/VIS/apps/apps_st/appl/per/12.0.0/mds/selfservice/absence/webui
(or import the page)
Classes Path:
/ora/VIS/apps/apps_st/comn/java/classes/oracle/apps/per/selfservice/absence
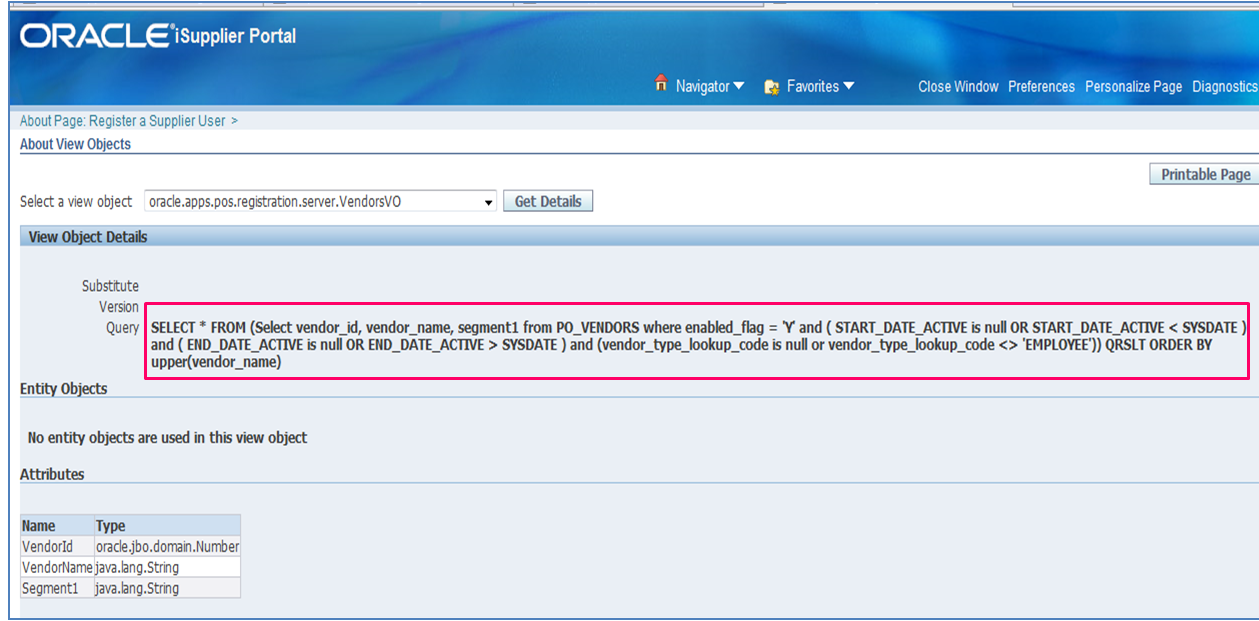
Click on the VendorsVO so that we can see the query statement used for that VendorsVO, the below image shows the query of vendorsVO which is used in Register Supplier User OAF page.
Step 2: Identify the page and copy or download it from Application Top.
Note that all the Pages and Regions will be there in Application Top and all the Controller (CO), Application Module (AM), View Object (VO) will be there in Java Top.
We can identify the page when we click on about this page, we can find one path which contains page name.
We can identify the page when we click on about this page, we can find one path which contains page name.

The below image shows the page in Server Application Top, from that we need to copy the file.
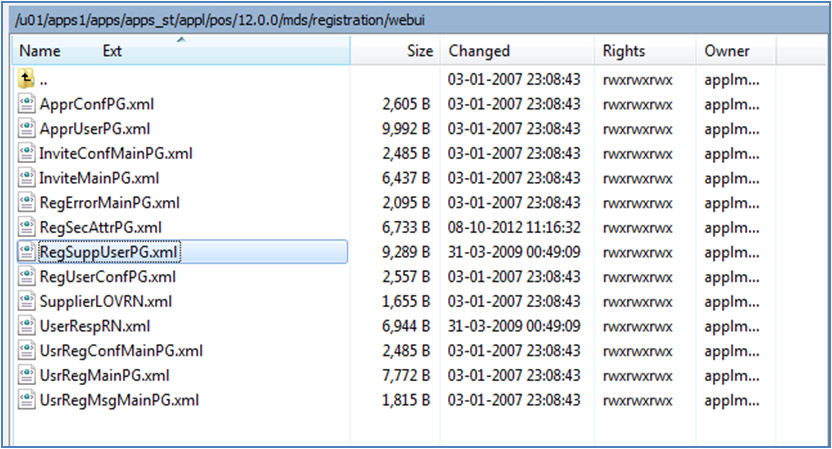
From the above Application Top we need to copy the “RegSuppUserPG.xml” page, note that the path may be different in your environment so check the path properly or concern the DBA for your required file to copy.
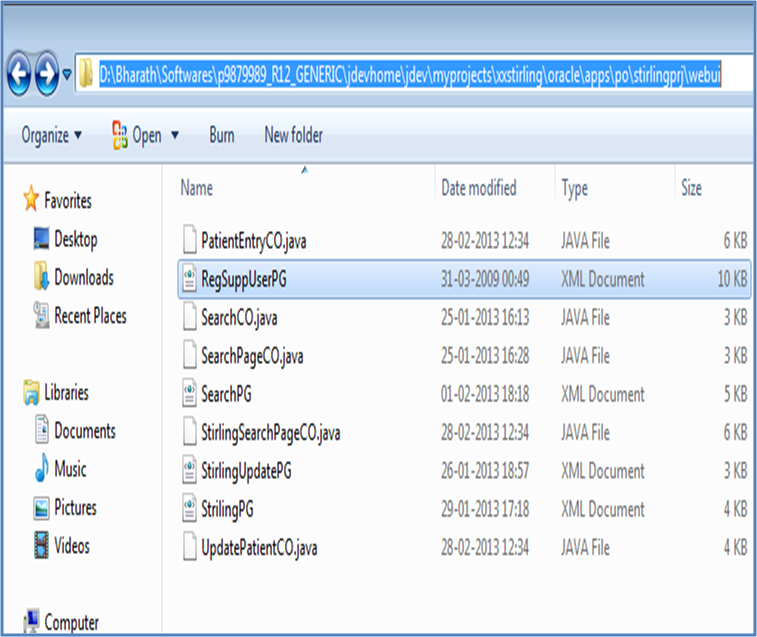
After copying the file move it to any existing project of OAF in desktop system for example see the below image it was moved into the following location in Desktop.
Note that we need to paste the page in Webui of JDeveloper
After copying open the JDeveloper so that we can see the copied page if JDeveloper is already open then refresh the JDeveloper so that the page will appear automatically. Select the page and we can see VO Name in the page structure.
For reference look at the below image:-
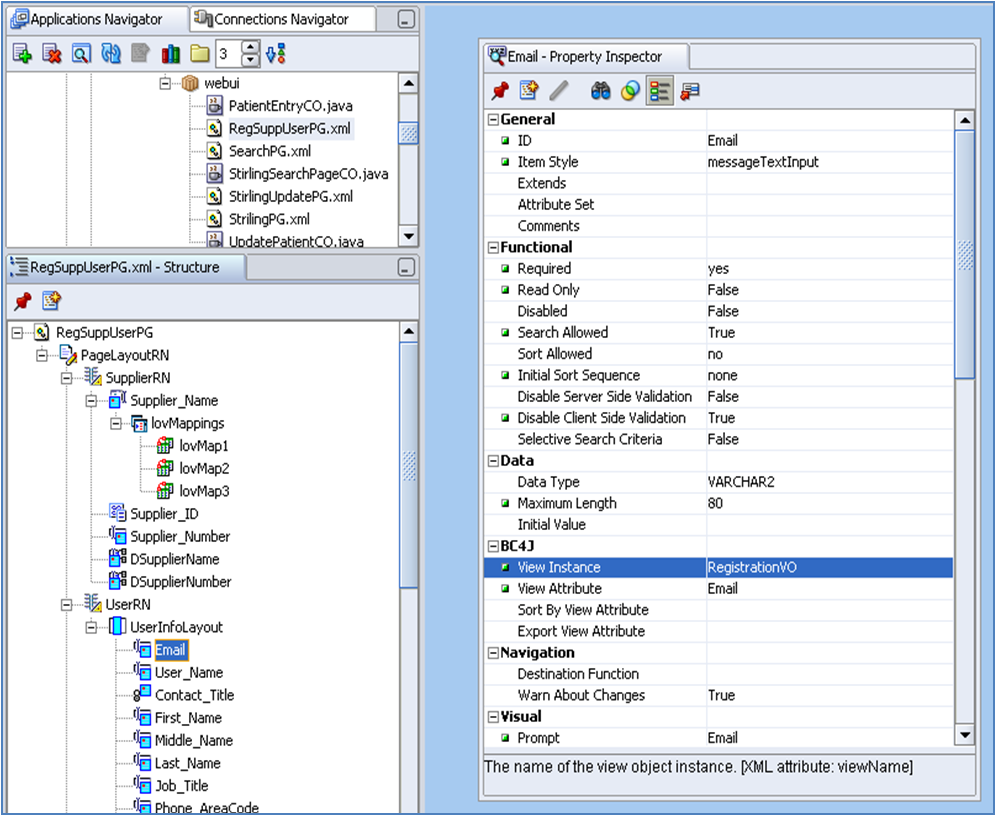
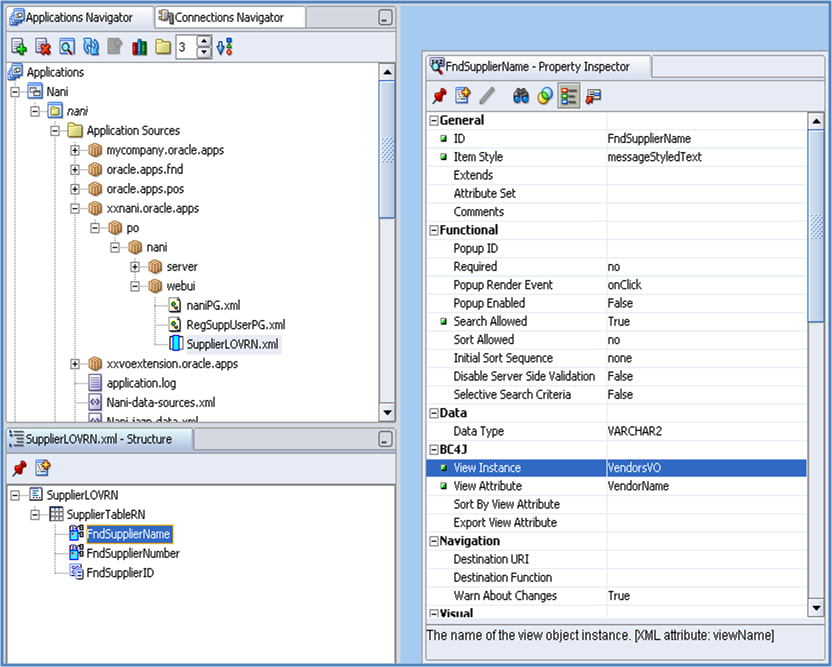
Here in the above page structure we can identify that VO name is RegistrationVO but for Supplier Name we can see that Oracle OAF standard page used External VO hence we need to carry the External VO too from the server. The below image shows the finding process of External VO in the original page structure.
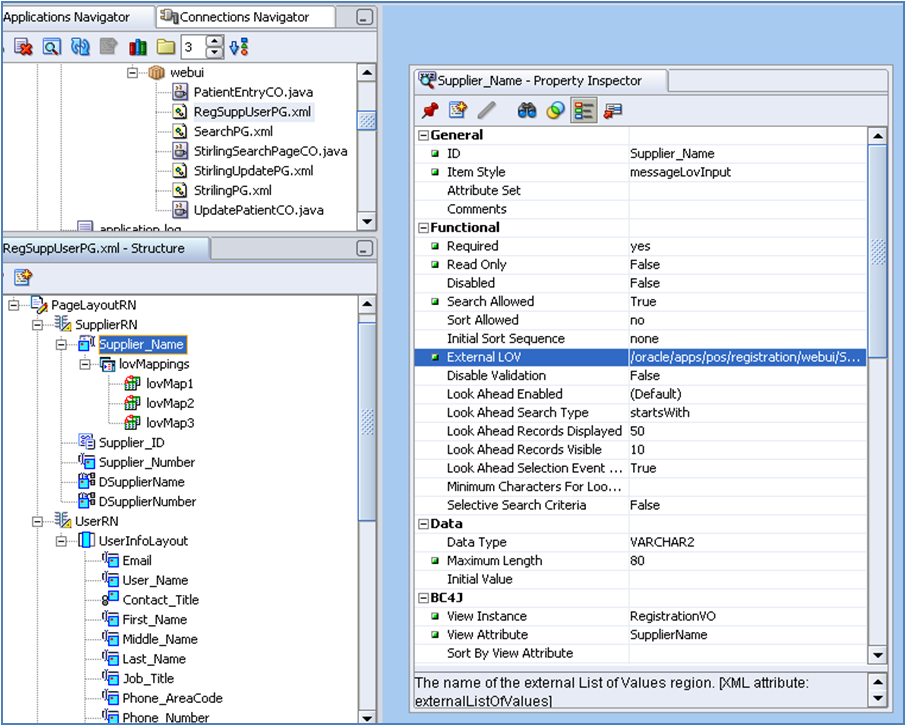
Now we can observe that the external LOV name is SupplierLOVRN, copy the SupplierLOVRN.xml file and paste it in the same location where we pasted the Register Supplier page. Refresh the JDevelper so that we can see the External LOV. Now in the external LOV we can identify the Exact VO which we need to extend to achieve our requirement.
The below image shows the finding process of exact VO from the External VO.
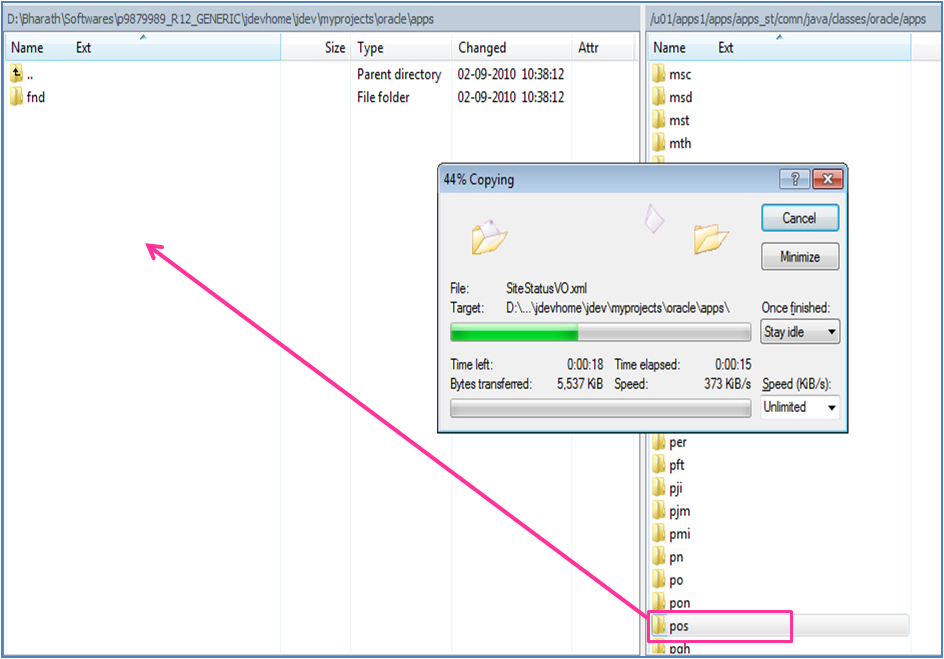
Step 3: Now finally after finding the exact VO download the VO from the Java Top and create the directory structure whatever the VO had in myProjects of desktop JDeveloper folder.
Note that the following image shows the pos directory in Apps server is copying to apps folder in Desktop JDeveloper, here if we are copying from oracle on wards then the JDevelper will take heavy time for further process, and hence we need to download only the required things from the Server.
The below image screenshot is of WinSCP tool.
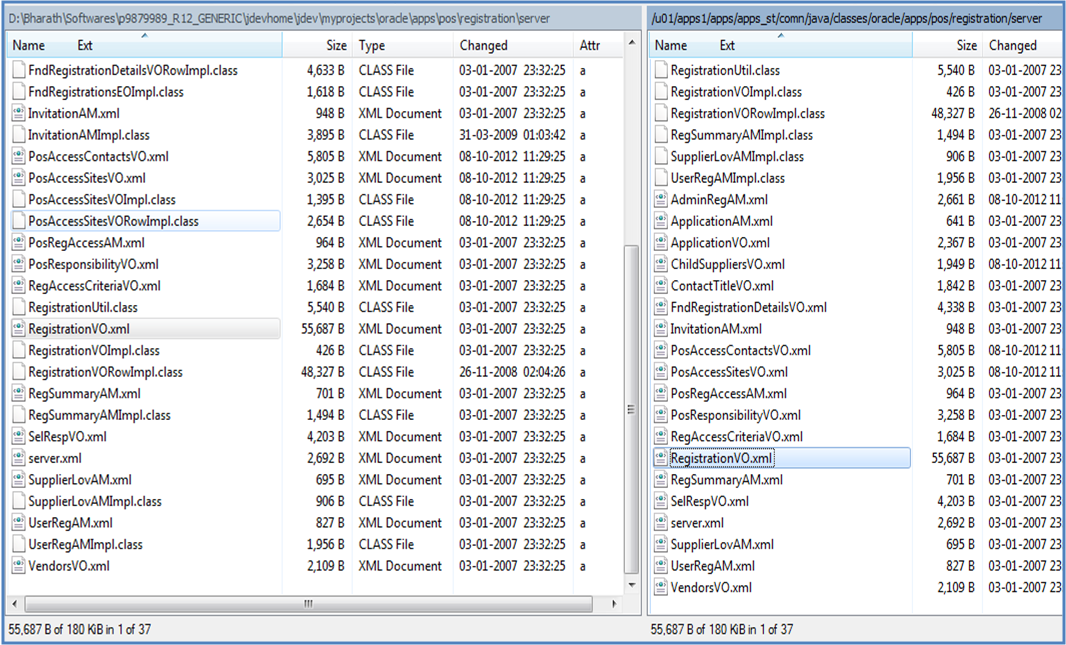
The below is image shows after copying and creating the same directory structure it looks like the following. N
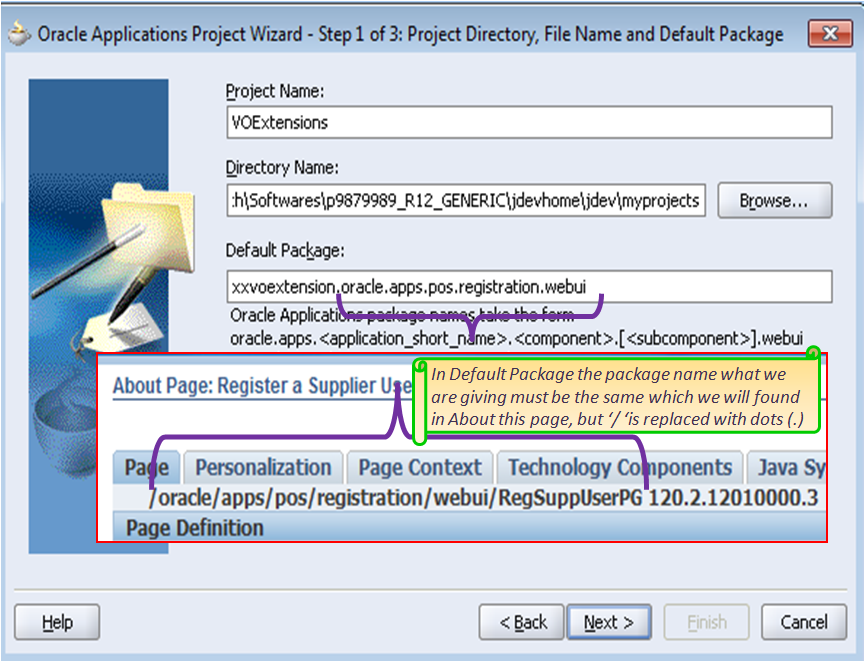
Step 4: After creating the directory structure now create one dummy workspace and Project in JDeveloper for VOExtension. And in the project creation process in step1 the default package name must be same as the path which we found in About this page. But here we need to remove the slash (/) symbol and in that place we have to keep dots (.), for reference have a look into the below image.
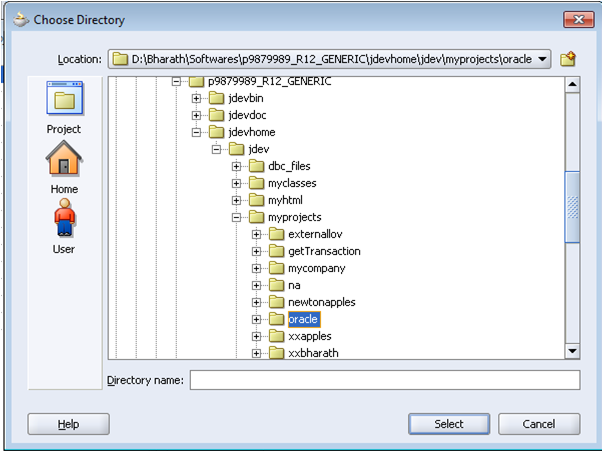
After creating project check that in applications “oracle.apps.pos” structure is available if you didn’t find that package then open the project properties, select Project Content.
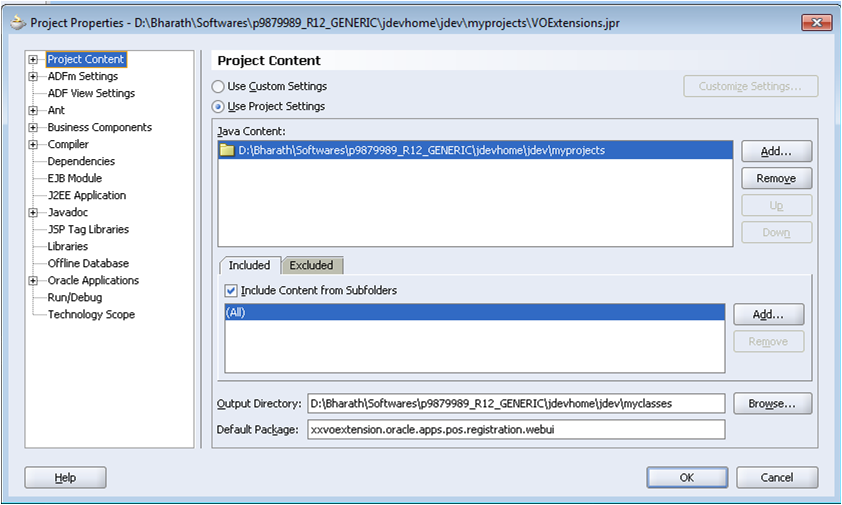
Click on Add button and select the proper directory structure. Select it and click on Ok now check that the Oracle.apps.pos package will appear.
Step 5:Copy the SQL Query from the VendorsVO and modify the Query in Toad or SQL Developer Tool or if any other and save the query and keep it aside. In query add the column name “vendor_type_lookup_code”. The modified SQL Query is shown below:
[sql]SELECT * FROM (Select vendor_id, vendor_name, segment1, vendor_type_lookup_code
from PO_VENDORS where enabled_flag = ‘Y’
and ( START_DATE_ACTIVE is null OR START_DATE_ACTIVE < SYSDATE ) and ( END_DATE_ACTIVE is null OR END_DATE_ACTIVE > SYSDATE )
and (vendor_type_lookup_code is null or vendor_type_lookup_code <> ‘EMPLOYEE’)) QRSLT
ORDER BY upper(vendor_name)[/sql]
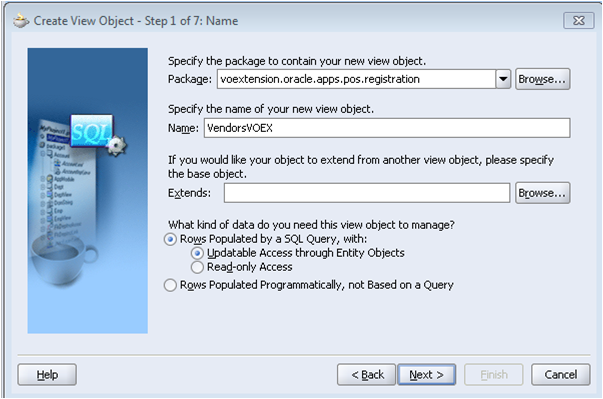
Step 6: Now create the New VO in custom directory. Extract the Package select Registration right click on it and then select New View Object… For reference look into the below image.

Some times while creating VO JDeveloper may show some dialogue box errors that required “so and so” file not found in the “package”, we can ignore these kind of messages click on OK but we must be very cautious about the missing files may be which are must required for our extension process.
The below image shows the package name specification process.
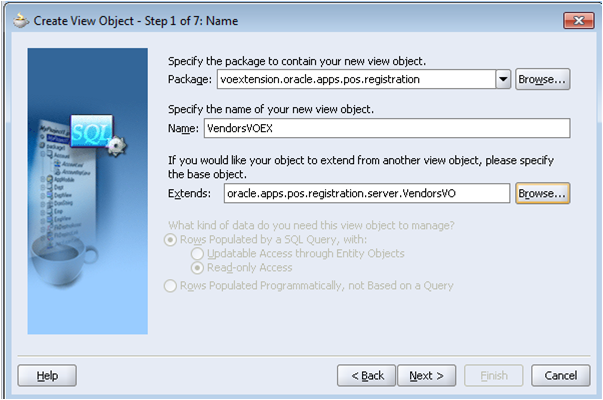
After that in the extends part click on the Browse button and then select the Original VO name that we can find in the directory structure which we copied and created same as it is in the server.

The below sample image shows After selecting the Extends VO.
After clicking next to the query remove the existing SQL Query and place the modified SQL Query in which we added a coloumn “vendor_type_lookup_code” and finish the VO creation process.
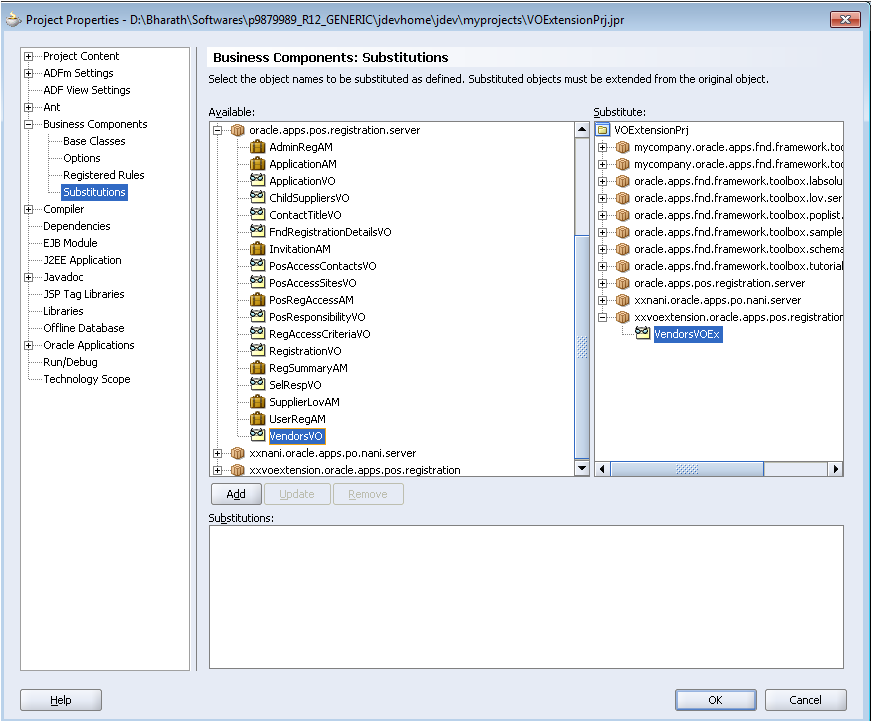
Step 7: Now we need to substitute the new VO with the existing VO for that select Tools -> Project Properties, for reference look into the below image.
Extract the Business Components, select Substitutions and then Select the proper VO from the available list and in Substitute list, for example as shown in the below image:
Extract the Business Components, select Substitutions and then Select the proper VO from the available list and in Substitute list, for example as shown in the below image:
After adding into the project properties now we need to move the project folder from MyClasses to the server environment Classes Directory. Be cautious while moving the files from desktop to the server. Here no need to replace the existing files at all for the first time.
To generate the class Files, just right click the package and click rebuild.
To generate the class Files, just right click the package and click rebuild.
The below figure shows the moving process from the desktop to the server.

After that run the jpxImport script, the below one is the sample JPXImport script.
java oracle.jrad.tools.xml.importer.JPXImporter $JAVA_TOP/xxvoextension/VOExtensionPrj.jpx -username apps -password apps -dbconnection "(description = (address_list = (address = (community = tcp.world)(protocol = tcp)(host =www.newtonapples.com/old)(port = 1521))) (connect_data = (service_name = naora1)))"
for Windows:
jpximport.bat D:\JDev_Home\jdevhome\jdev\myprojects\hrss_extensions.jpx -username apps -password apps -dbconnection "(DESCRIPTION=(ADDRESS_LIST=(ADDRESS=(PROTOCOL=tcp)(HOST=10.10.10.10)(PORT=1521)))(CONNECT_DATA=(SERVICE_NAME=PROFFRD2)))"
for Windows:
jpximport.bat D:\JDev_Home\jdevhome\jdev\myprojects\hrss_extensions.jpx -username apps -password apps -dbconnection "(DESCRIPTION=(ADDRESS_LIST=(ADDRESS=(PROTOCOL=tcp)(HOST=10.10.10.10)(PORT=1521)))(CONNECT_DATA=(SERVICE_NAME=PROFFRD2)))"
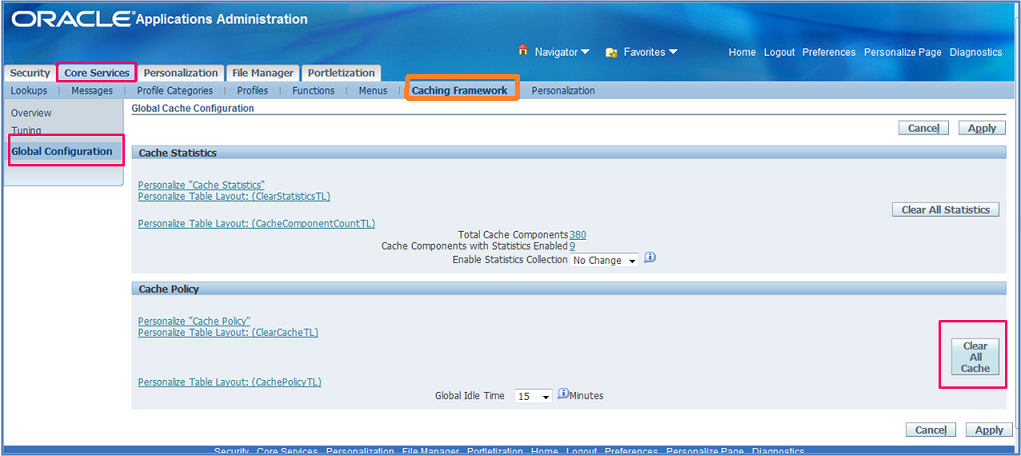
After successfully running import script, now go to Functional Administrator, click on Core Service Tab and then select Caching Framwork -> Click on Clear All Cache button. We can even click on Clear All Statistics button if we want.
The below image shows the functional administrator page.
After that check whether the Extended VO is available or not in the About this page once the extended VO appears then now click on the LOV option of Supplier Name.
Click on “Personalize Supplier Table”.
After clicking on it create one item and select level as site and item type as Message Styled Text. We need to create one item because we modified VO and we added column to the VO but we not yet displayed it in OAF page so to display it in OAF page we need to create one item.
Here in View Instance we need to give the old VO name rather than the new VO name. For view attribute give the attribute name which is generated when we click on the Next button after modifying VO we will find the attribute name for Vendor_type_lookup_code that name we need to give here.
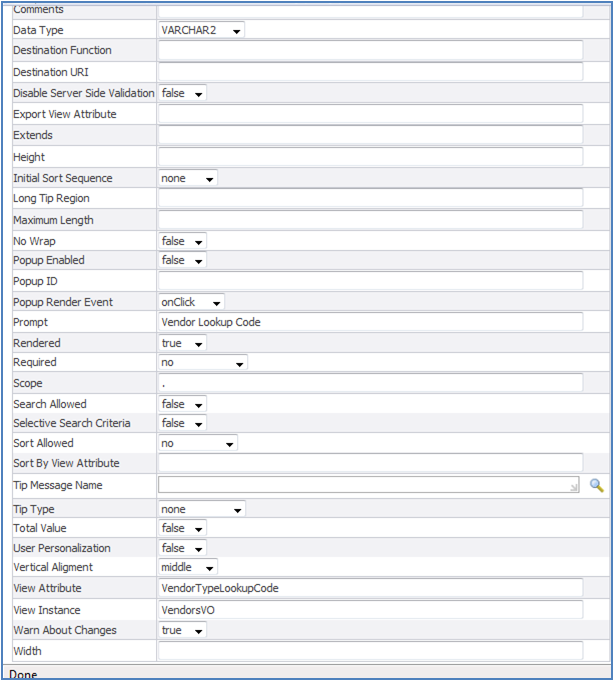
Save the newly created item and now again click on the Supplier name so there fore here we go and we can find the Vendor Lookup Code which we created.
So therefore finally we finished the VO Extension process in OAF.
Quite useful and clear and clean one. Thanks for your effor.
ReplyDelete