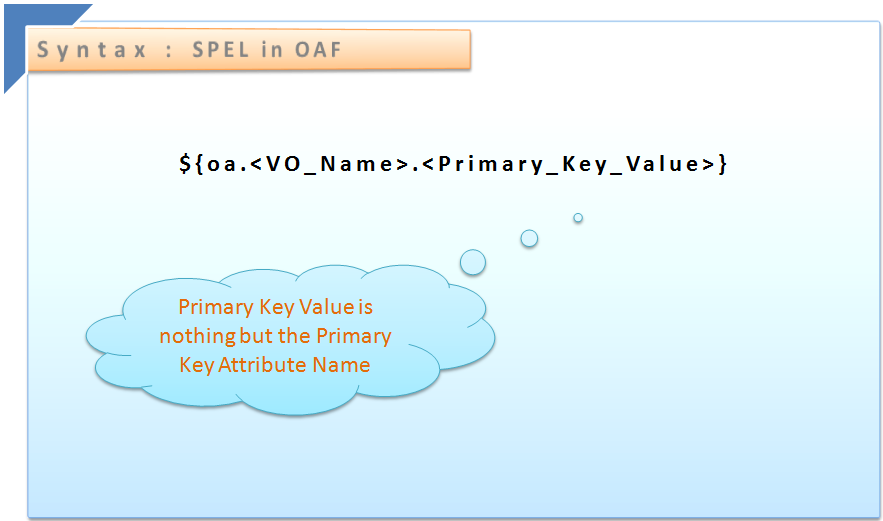
SPEL stands for “Simplest Possible Expression Language”.
line1 :- Destination Page Path : Complete path of the OAF page.

Now whenever we click on the image item then it must show us the information in different form, for that we need to write the following code in processFormsRequest of controller:

C
SPEL in OAF
Calling One Form to Another Form
In this lesson we will see how to call one page from the current page in OAF. To create link between two pages we have “pageContext.serForwardURL”.
First create WorkSpace and project.
Create AM, create page and attach AM to the page.
Here we are creating VO which displays employee information which are entered using the previous chapter page.
We know that to display data we need to create VO, attach VO to AM and then we need to execute the VO query whenever we click on the button, so there fore for that we need to write the code in the Process Form Request of Controller.
To know how to display data from the data base see the chapter called Displaying Data from DataBase.
Let us see the parameter list in “pageContext.setForwardURL”.
Let us see the parameter list in “pageContext.setForwardURL”.
Example code is :
line1 : pageContext.setForwardURL (DestinationPagePath,
line2: null,
line3 : menu_context,
line4 : null,
line5 : params(null),
line6 : RetainAM(true),
line7 : ADD_Bread_Crumbs,
line8 : Ignore_Messages);
line1 :- Destination Page Path : Complete path of the OAF page.
line2:- null : If we want to call oracle apps form then then in first line Destination page path is null and here we will give the function name of the form. Line1 and Line2 are interlinked.
line3:- menu_context: We can include any number of menus as we require.
line4:- null: if we want only one particular menu then here we will specify that menu name and in line3 we need to pass null, line3 and line4 are interlinked.
line5: -params(null) : If we want to carry the values then we pass those values here.
line6:- RetainAM(true): generally this will be set to true value.
line7: -Add_Bread_Crumbs: If we want the link to carry to next page and store in the memory.
line8:-Ignore Messages: It will restrict the messages to not to carry from one page to another.
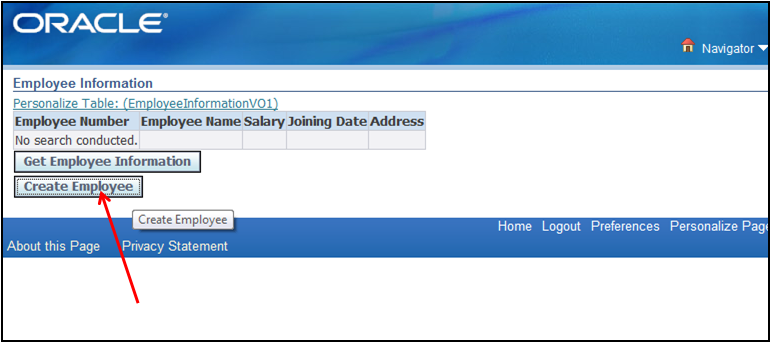
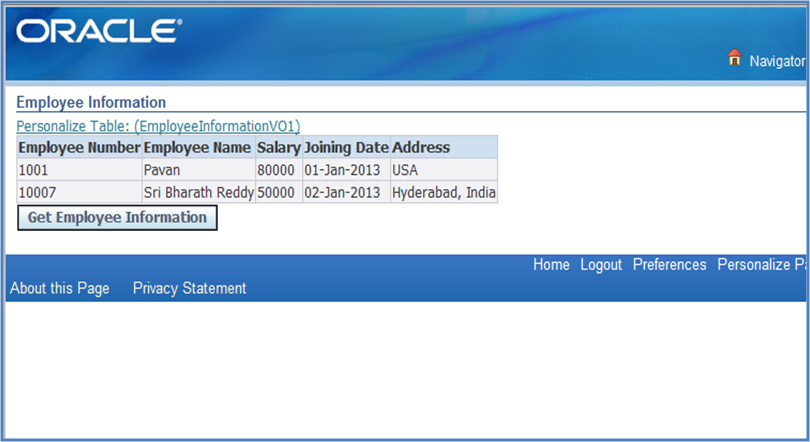
In this chapter we used displaying data of employees information which are entered in Data Entry page of previous lesson, if we want to see the employees information then we need to click on the button “Get Employee Information” and to create a new employee we need to click on “Create Employee” button.
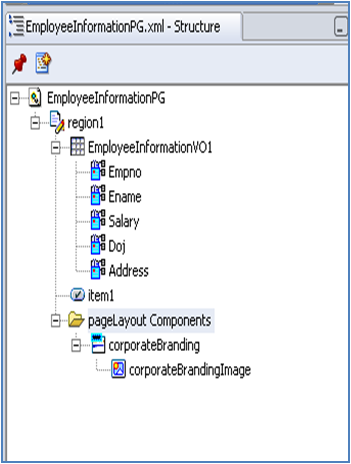
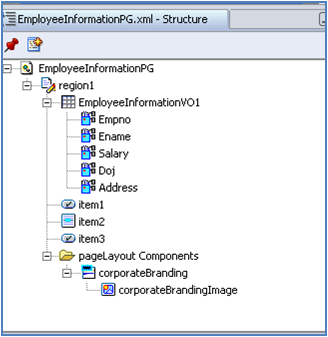
The page structure of the Project what we are using now contains one main region and under it One Table Using Wizard Region, two submit buttons. The following figure shows the page structure:
If we run the page after creating VO and executing that VO whenever we click on the “Get Employee Information” then the output looks like the following:
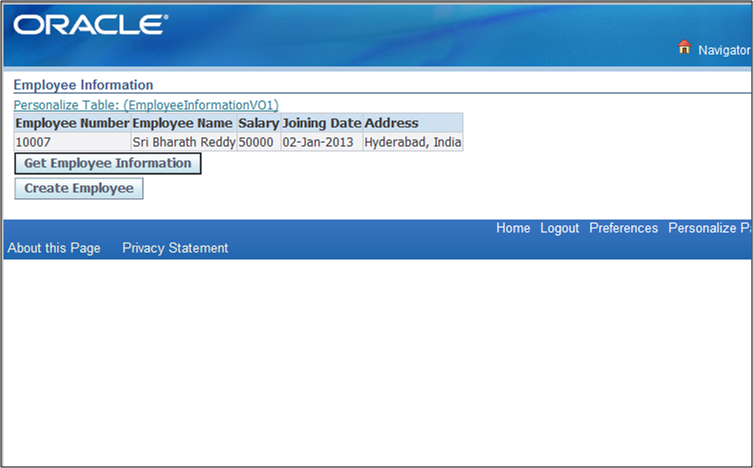
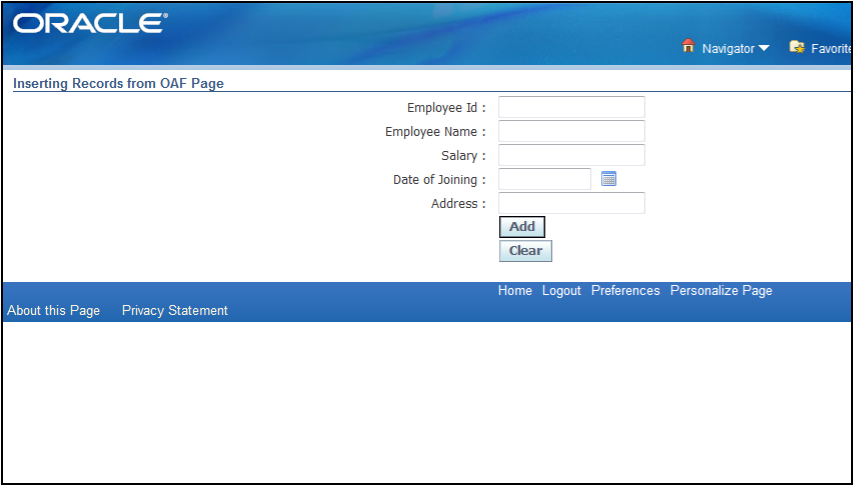
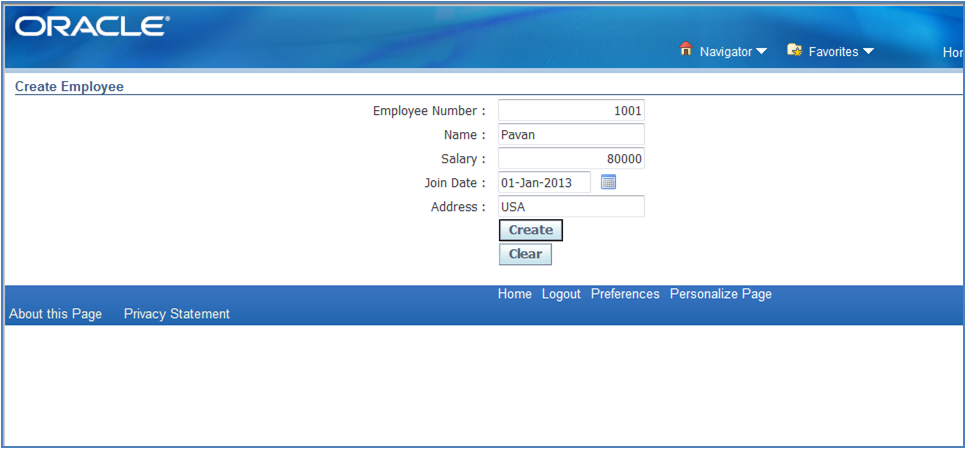
If we observe in the output whenever we click on the Create Employee button it must take us to the Create Employee page which we created and seen in previous lesson.
Whenever we click on the Create Employee button then only it must take us to the Create Employee page so for that we need to write the code in the “processFormRequest” of controller and the code in processFormRequest is:
[sql]if(pageContext.getParameter(“item3”)!=null)
{
pageContext.setForwardURL(“OA.jsp?page=/xxapples/oracle/apps/po/insertingrecords/webui/InsertDataPG”,
null,
OAWebBeanConstants.KEEP_MENU_CONTEXT,
null,
null,
true,
OAWebBeanConstants.ADD_BREAD_CRUMB_YES,
OAWebBeanConstants.IGNORE_MESSAGES);
}[/sql]
{
pageContext.setForwardURL(“OA.jsp?page=/xxapples/oracle/apps/po/insertingrecords/webui/InsertDataPG”,
null,
OAWebBeanConstants.KEEP_MENU_CONTEXT,
null,
null,
true,
OAWebBeanConstants.ADD_BREAD_CRUMB_YES,
OAWebBeanConstants.IGNORE_MESSAGES);
}[/sql]
In the program “item3” is the id value of the Create Employee button. When we rebuild the code and run the page then the output looks like the following:
Now after clicking on the Create Employee button it leads us to Create Employee page:
SPEL stands for “Simplest Possible Expression Language”.
SPEL is used to carry the values dynamically. SPEL will get the value dynamically at runtime. SPEL is the Boolean Value (True / False).
The syntax of SPEL is:
The syntax of SPEL is:
Now let us see the previous chapter output which shows the Employee Information when we click on “Get Employee Information” button now the same output we are adding one image icon so that it appears to each and every row as shown in the below figure:
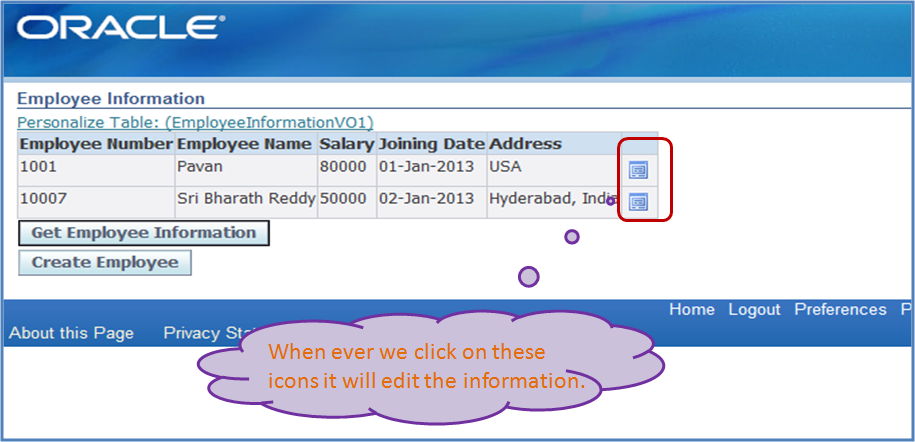
Now we will see the process how to add edit image for each row in a table. For that first we need a page structure as follows:
In the above page structure we created a region Using Wizard and the region style is “Table”. Item1 is the submit button whenever we click on the Submit Button(Get Employee Information) it displays the employee information as shown in the below figure:
Now go to the table region, right click on the table region select New -> Item.
In the Property Inspector of item do the following changes:
In the Property Inspector of item do the following changes:
- Select the Item style as image.
- In Image URL give the name of the image for example for edit image we have predefined images in “p9879989_R12_GENERIC\jdevhome\jdev\myhtml\OA_MEDIA” , give the following image in Image URI /OA_MEDIA/detailsicon_enabled.gif.
- In client action select Action Type as “fireAction“.x
- In client action give Event name as “Edit“
Now the page structure looks like:
Now run the page and click on the button “Get Employee Information” so that the output looks like the above picture what we have seen early.
Now whenever we click on the image item then it must show us the information in different form, for that we need to write the following code in processFormsRequest of controller:
[sql]if(“Edit”.equals(pageContext.getParameter(EVENT_PARAM)))
{
pageContext.setForwardURL(“OA.jsp?page=/xxapples/oracle/apps/po/insertingrecords/webui/InsertDataPG”,
null,
OAWebBeanConstants.KEEP_MENU_CONTEXT,
null,
null,
true,
OAWebBeanConstants.ADD_BREAD_CRUMB_YES,
OAWebBeanConstants.IGNORE_MESSAGES);
}[/sql]
In IF condition “Edit” is the Client Action Event Name which we have given. The remaining code logic is same which we used in previous chapter takes us to create employee page but here we need to carry the data to that page rather than creating employee.
To achieve these requirement we need to create a spell, keep continue reading so that we will come to know how to create a SPELL in OAF.
SPEL creation in OAF, we know the syntax of SPEL now we need to create a SPEL for the image item in a table.
The SPEL value for the above is as follows:
The SPEL value for the above is as follows:
${oa.EmployeeSearchVO1.Empno}
EmployeeSearchVO1 is the name of the VO which is used to get the details of employees.
Empno is the primary key value (attribute name)/ column name of the table in view.
Now we need to pass the above spel to image, for that select the image and then in Property Inspector,
Client Action -> Parameters
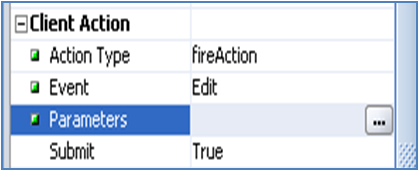
Once we click on the icon a Parameters window will get open in that, click on Add Parameters button and then give some name (example pempno) in the value pass the SPEL what we created ( ${oa.EmployeeSearchVO1.Empno} ). After giving name and passing SPEL value in the Value field click on OK button.
Now we need to call this parameter in the Create Employee page CO because whenever we click on the image item in the table list showing employee details it takes us to the Create Employee Page but it will not carry any values here our task is to carry values.
So therefore we need to write the code in processRequest of the controller class of Insert Employee details page. The code is as follows:
[sql]public void processRequest(OAPageContext pageContext, OAWebBean webBean)
{
super.processRequest(pageContext, webBean);
{
super.processRequest(pageContext, webBean);
BharathAMImpl am=(BharathAMImpl)pageContext.getApplicationModule(webBean);
if(pageContext.getParameter(“pempno”)!=null)
{
String hid = pageContext.getParameter(“pempno”).toString();
String whereclause = “EMPNO='”+hid+”‘”;
am.getEmployeeCreateVO1().setWhereClause(null);
am.getEmployeeCreateVO1().setWhereClause(whereclause);
am.getEmployeeCreateVO1().executeQuery();
}
else
{
am.InsertEmployeeRecord();
}
}[/sql]
{
String hid = pageContext.getParameter(“pempno”).toString();
String whereclause = “EMPNO='”+hid+”‘”;
am.getEmployeeCreateVO1().setWhereClause(null);
am.getEmployeeCreateVO1().setWhereClause(whereclause);
am.getEmployeeCreateVO1().executeQuery();
}
else
{
am.InsertEmployeeRecord();
}
}[/sql]
Now rebuild the code, rebuild the pages run the Employee Information Page, click on the Get Employee Information button and then click on the image item which is displayed on each available rows so that it takes us to create employee page but here it carries the row values. The sample output is shown in the below figure:
C
No comments:
Post a Comment