Message Component Layout Region
In this chapter we are going to learn creation of regions in the page and for each region here we are taking two or more items with item style as “messageTextInput” so that we will come to know that how the items are placed in the regions. Each region will place items in different styles. Let us see some layout regions:
1) Message Component Layout Region
1) Message Component Layout Region
First create one Project which we learned in previous chapters like Welcome Page creation.
After creating a page, go to page structure and select region after selecting region right click on the region and then select New-> Region. Now a region will be created under a page region.
After creating region change the region style to “MessageComponentLayout” in the property Inspector as shown in the below figure:

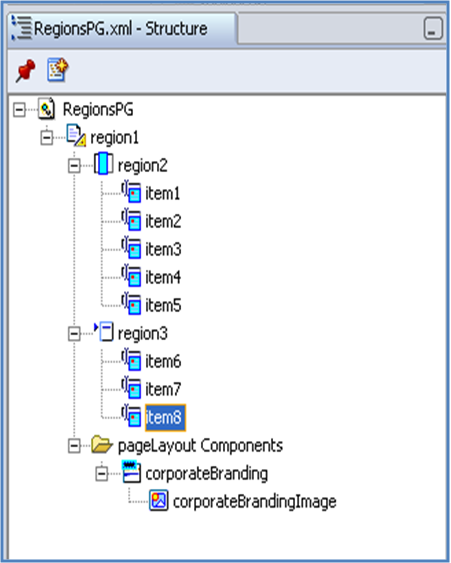
Observe the property inspector and in the visual we added 1 to the rows and 3 to the columns, to see how this rows and columns effect. See the output and observe the items how they are placed by JDeveloper automatically, for that first create items under MessageComponentLayout region, here we created 5 items under the message component layout region and then after creating see the structure of the page how it looks like:

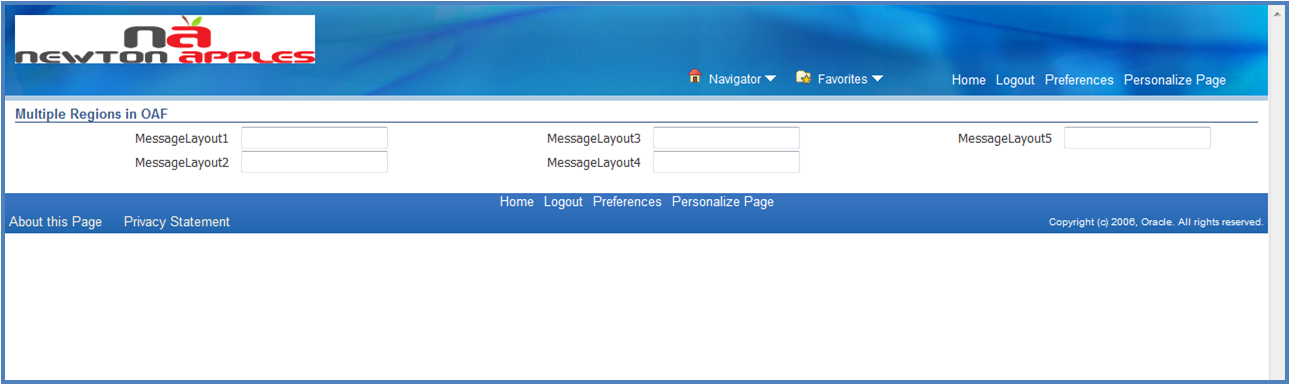
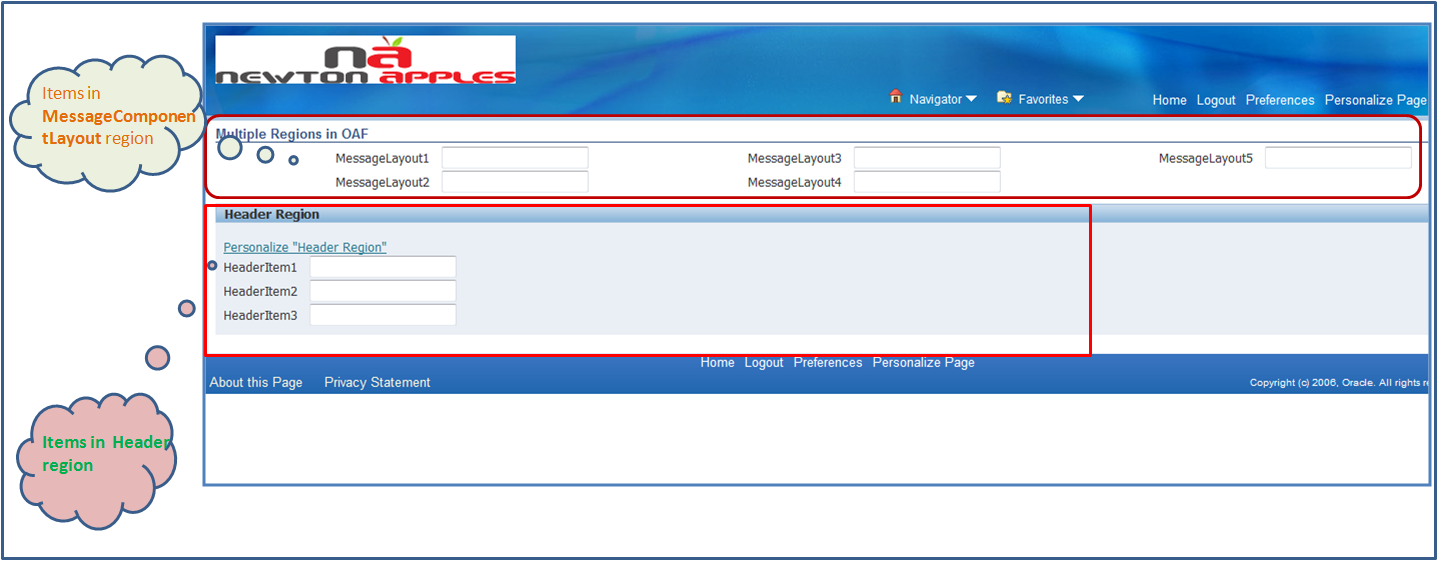
Give the prompt names to each items and remember here we are taking item style as “messageTextInput” for all the items, run the page and see the output to see how the items are placed in message Component Layout region:
Follow the next lesson which shows Header Region how it looks like.
Header Region
In previous lesson we learned how the Message Component Layout region looks like and how to create it, now using the same page here in this lesson we are going to see how the Header Region looks like and what are the properties available in the Header region in JDeveloper.
Header Region Creation:
Header Region Creation:
Right click on the main region and select the New -> Region as shown in the below figure:
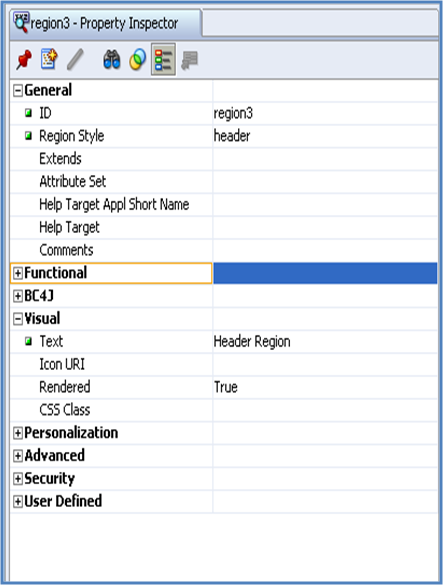
Select the region style as Header and if we observe in the visual area we can provide Text, give some text like Header Region and while when comparing this header region with the message component layout region we can observe that in message component layout region we don,t have a option to provide Heading text where as in Header region we can provide headings but item control is not there like rows and columns in MessageComponentLayout Region.
The below figure shows the property inspector of Header Region just have a look:
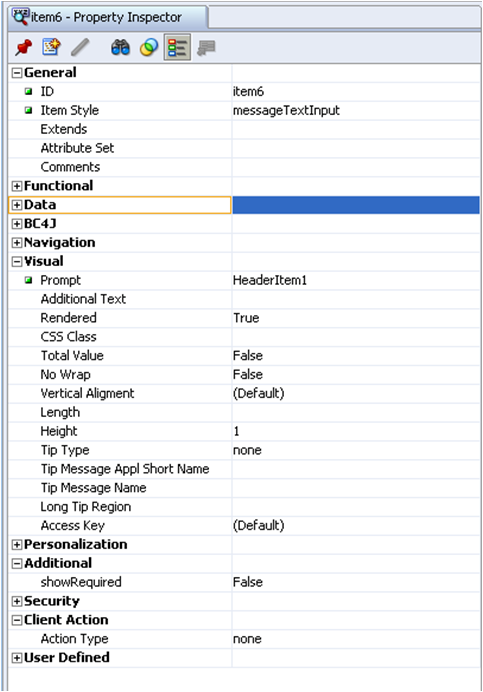
Now after creating Header region create three items with Item Style as MessageTextInput:
v

Similarly create two more items to see the items arrangement in Header Region, and note that for all the items the item style is MessageTextInput.
Give some prompt names to all the items:
Give some prompt names to all the items:
After creating three items the structure of the page looks like the following:
Now run the page and see the output here we can identify the difference between Header region and MessageComponentLayout region:
Row Layout Region
In this lesson we are going to see how the rowLayout Region looks like and how the items are displayed inside the Row Layout Region.
Creating Row Layout Region:
Creating Row Layout Region:
First create one page, here we are taking the same page which we created in the previous chapters and it already contains MessageComponetLayout region and Header region.
Create one region, right click on the main region and then select New -> Region
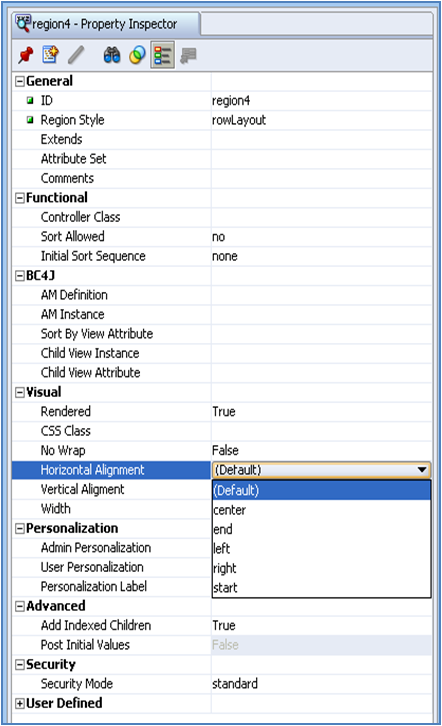
Select region style as “rowLayout” in the Property Inspector, and if we observe the Property Inspector we have Horizontal Alignment and Vertical Aligment .
Center, End, Left, Right, Start are the available alignments for Horizontal. By Default , Default is the alignment type which is nothing but works as Start Alignment.
For Vertical Alignment Bottom, Middle, and Top are the available alignments.
The below picture shows the property inspector of Row Layout Region:
The below picture shows the property inspector of Row Layout Region:
After creating RowLayout region create four items under the rowLayoutRegion and also give prompt names for each created items under RowLayout region.
Now run the page and see the output, it displays all the items in single row.
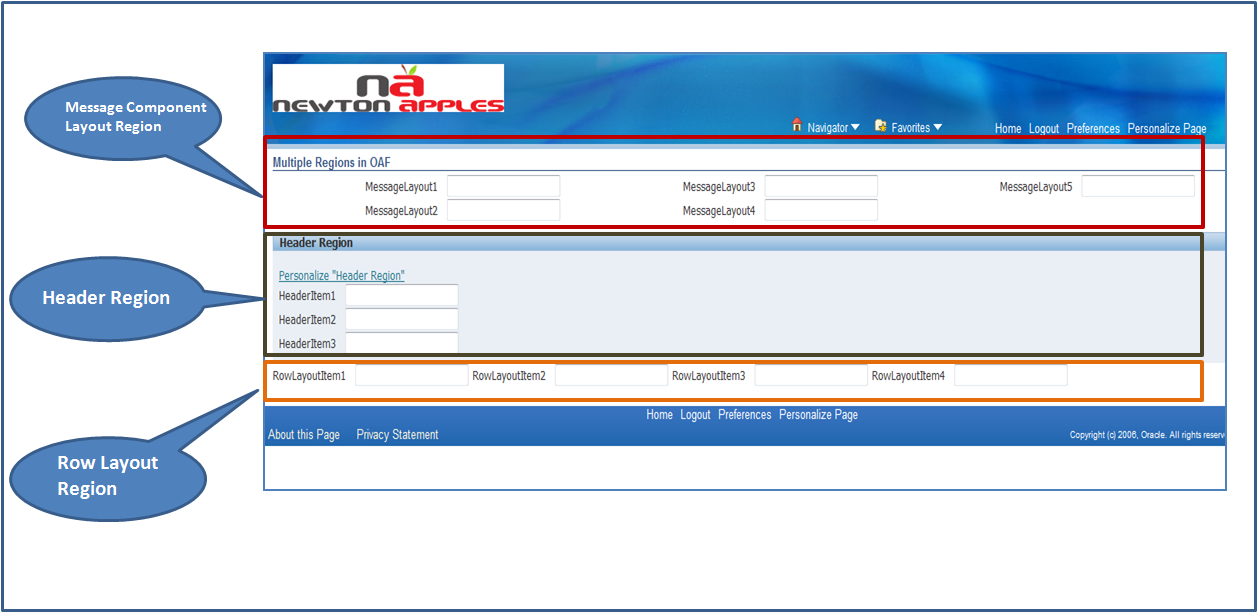
The below figure shows how the output looks like and also observe that in the below figure how the items are placed in MessgeComponentLayout region and Header Region along with the Row Layout region.
Default Double Column
In this lesson we are going to learn about Default Double column region which generally displays Items in only two columns, let us create a Default double column region and create some items init and see how it looks like.
Creating Default Double Column Region:
Creating Default Double Column Region:
First create one page in the project and then under the main page region create one new region.
Right click on the main region, select New -> Region.
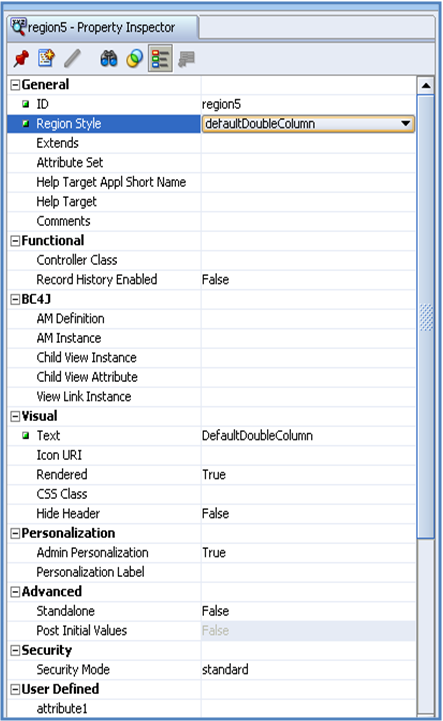
In the property inspector select the region style as “defaultDoubleColumn”.
After selecting Region Style as Default Double Column we can see in the visual Text and Item URI fields are available it means for Default Double Column we can give Text value to the region and also we can place any images if required.
The below figure shows the Property Inspector of Default Double Column:
The below figure shows the Property Inspector of Default Double Column:
 ‘
‘
Now after creating Default double Column region create three items under Default Double Column region and note that all the items the Item Style is messageTextInput and give some prompt name for all the created items.
After creating items under the default Double Column region the page structure look like the following which shows Default Double Column region and along with also shows items structure of Message Component Layout region , Header Region , and Row Layout region.
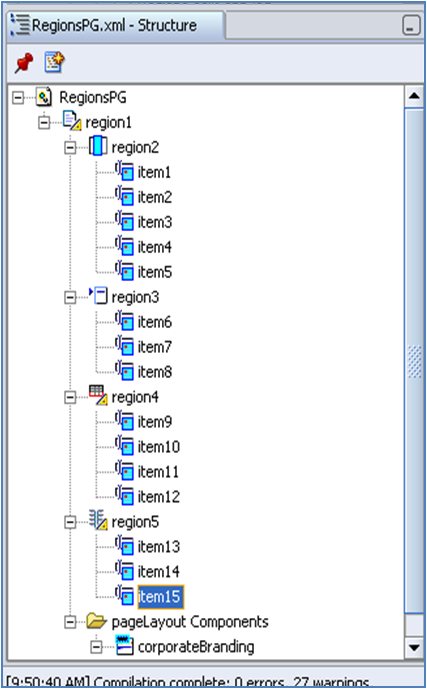
In the above figure region5 is the Default Double Column.
Now run the page and see the output which shows how the items are placed inside the default Double Column and also it compares with the other regions.

Default Single Column
In this lesson we see how to create Default Single column and how the items inside the Default Single column appears in the OAF (Oracle Apps Framework) page.
Creating Default Single Column:
Creating Default Single Column:
First create one page in the project and then create one region under the main region as shown in the below picture:
Right click on the main region, select New -> Region.

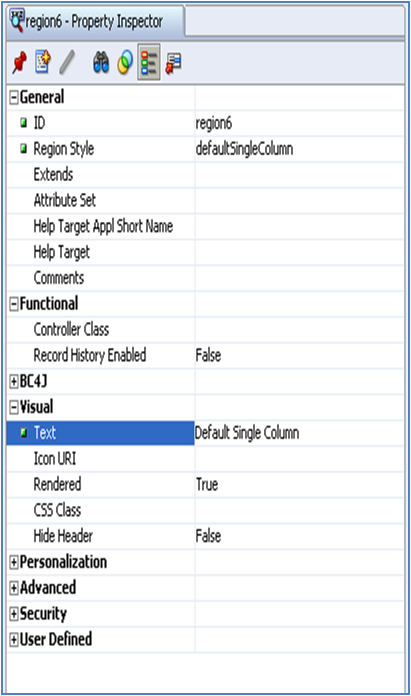
Here we are taking the page which we created in the previous chapters. After creating the region select the Region Style as “DefaultSingleColumn”, the below figure shows the Property Inspector of Default Double Column.
Create three items under Default Single Column region and also give prompt names to each MessageTextInput items created.
After creating three items and giving prompt names, run the page and see the output how the items in the Default Single Column region are displayed.
In the below figure if you observe we can see the difference between other regions along with the Default Single Column.
Page Button Bar
In this lesson we are going to learn how to create Page Button Bar.
In the Page Button Bar region the items what we placed under it we can see in top and bottom of the pages. It means this region is helpful if we scroll down to the page and we need to click on some button to perform certain action then we can create those items under Page Button Bar region.
The items inside Page Button Bar works just like in our mail accounts generally if we open a mail then we can delete that mail by clicking on Delete button and if we observe in most accounts Delete button is available on top of the mail and even bottom.
Creating Page Button Bar:
Creating Page Button Bar:
First create one page in a project.
Here we are taking the same page which we created early contains five other regions.
Under the main region in a page create one more region and select region style as “Page Button Bar”.
The property inspector of Page Button bar is:
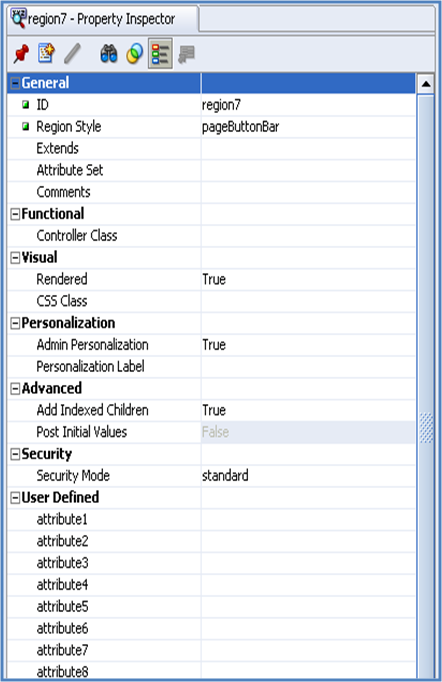
The property inspector of Page Button bar is:
After creating region with Region Style as “Page Button Bar”, create two items under the region and select Item Style as SubmitButton.

For one Submit Button item give prompt as “Ok” and for other give prompt as “Cancel”.
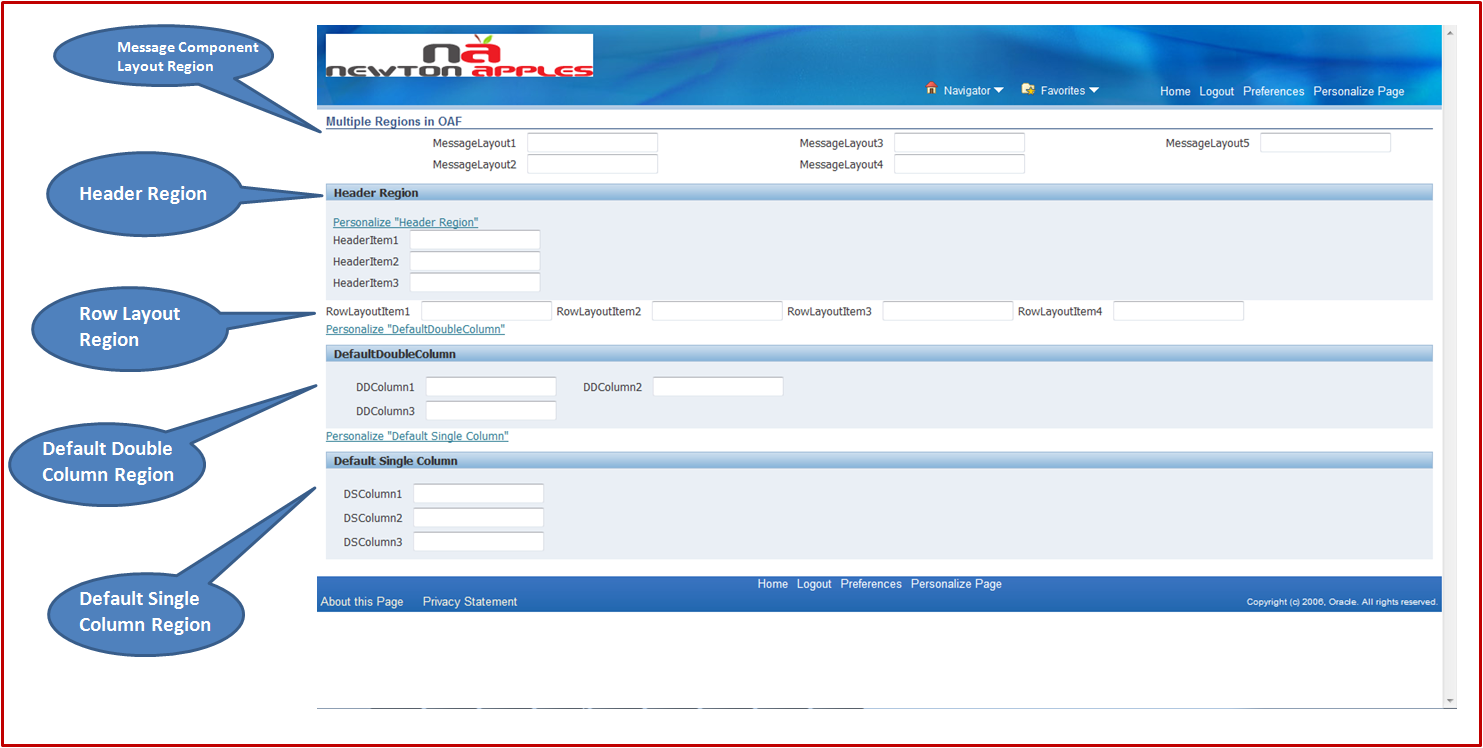
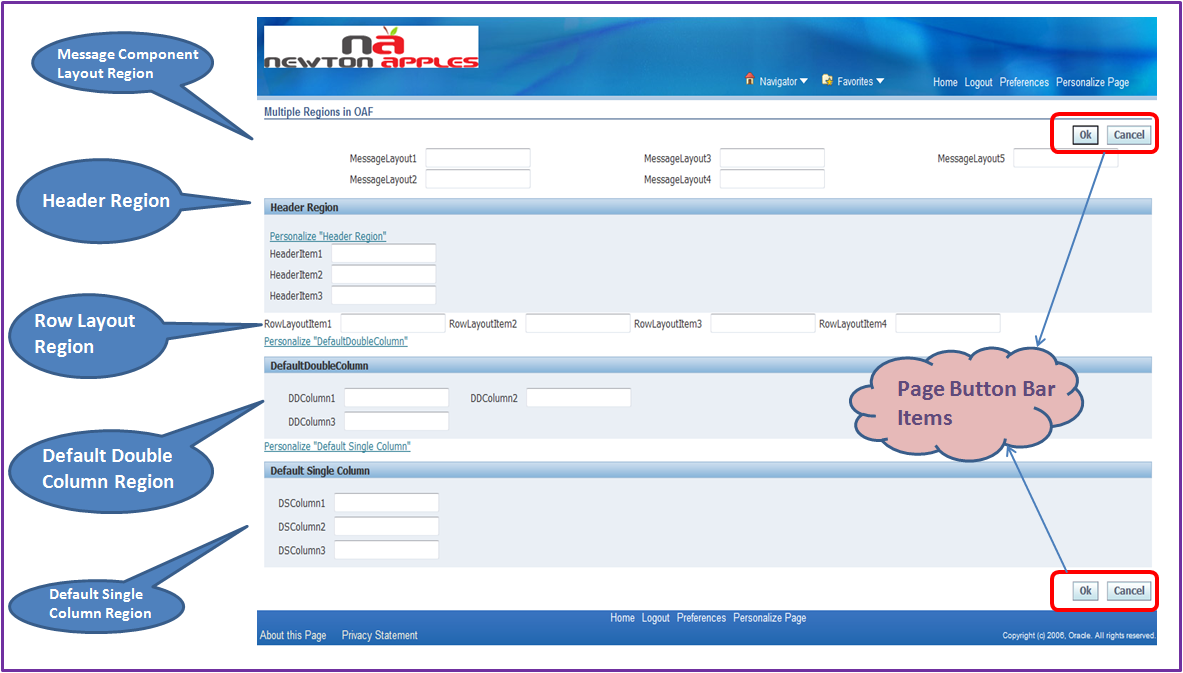
Now after creating items under the Page Button Bar region, run the page and see the output we can see in the output items will be displayed on top and bottom of the page. Look at the below figure which shows the look of output and also it shows how the items in the other region are placed:
Now after creating items under the Page Button Bar region, run the page and see the output we can see in the output items will be displayed on top and bottom of the page. Look at the below figure which shows the look of output and also it shows how the items in the other region are placed:
Query Region
In this lesson we are going to see how the Query Region is going to look in OAF page and what is the use of the Query Region in OAF.
Generally we use Query Region in search pages.
So therefore we are going to see how to create this Query region in the next coming chapter called “Search Pages in OAF”.
We have four types of searches in OAF.
Generally we use Query Region in search pages.
So therefore we are going to see how to create this Query region in the next coming chapter called “Search Pages in OAF”.
We have four types of searches in OAF.
- Automatic Search Inline LOV
- Automatic Search External LOV
- Result Base Search
No comments:
Post a Comment