AM Extension in OAF
This OAF tutorial lesson will explain how to extend AM (Application Module) in OAF using one sample exercise, so that we will get knowledge in OAF AM Extension.
First of all let us understand the requirement. We have one Responsibility called “OA Framework ToolBox Tutorial Labs”. If you don’t have that Responsibility go to System Administrator Responsibility -> User and add the Responsibility. The application for the OA Framework ToolBox Tutorial Labs is “Common Modules-AK”.
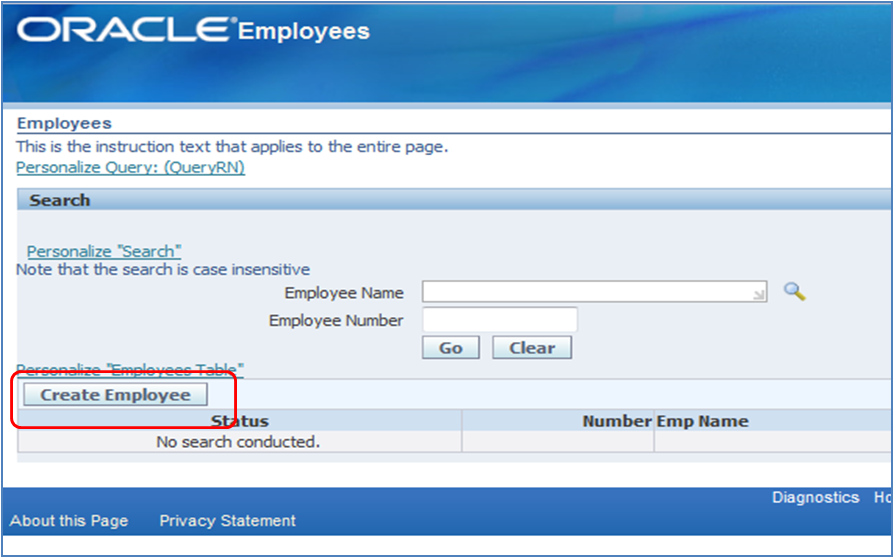
In the responsibility navigate to “Main Employee Search”.
OA Framework ToolBox Tutorial Labs -> Tutorial Lab -> Employees -> Main Employee Search
nbsp;
The below image shows the same Navigation Process:
nbsp;
The below image shows the same Navigation Process:
After navigating to the Main Employee Search page we have a button called Create Employee. Whenever we click on Create Employee Button it will take us to another page for creating employee.
After creating employee here obviously we will click on Apply button to add employee details but whenever we click on Apply button we are creating employee that is fine and hence there is no Table to track which user created particular Employee.
So therefore here our requirement is to maintain the track Record of User Information, for Example if we logged in with user name as Operations then after creating Employee we need to maintain such information like User Operations created so and so employee.
Let us see the AM extension part step wise:-
Step 1: Create one Custom table. Note that the following custom table is not required to register in Oracle Apps because we are not using any KFF(Key Flex Fields) or DFF(Descriptive Flex Fields) in table.
[sql]CREATE TABLE XX_USER(user_id VARCHAR2(40),
user_name VARCHAR2(40),
last_update_login NUMBER,
last_updated_by NUMBER,
last_updated_date DATE,
creation_date DATE,
created_by NUMBER)
[/sql]
user_name VARCHAR2(40),
last_update_login NUMBER,
last_updated_by NUMBER,
last_updated_date DATE,
creation_date DATE,
created_by NUMBER)
[/sql]
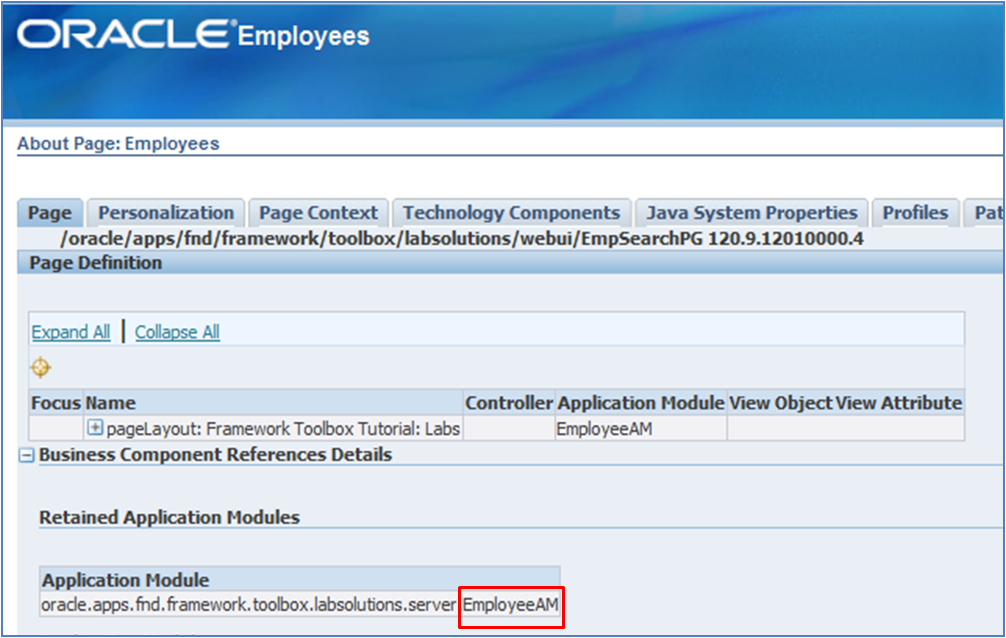
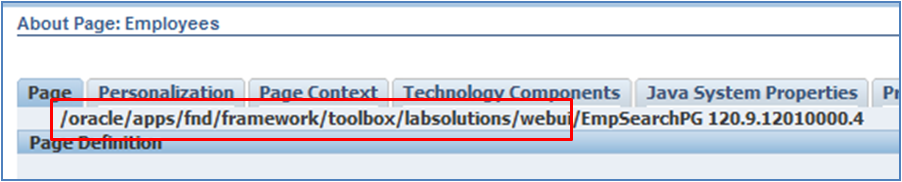
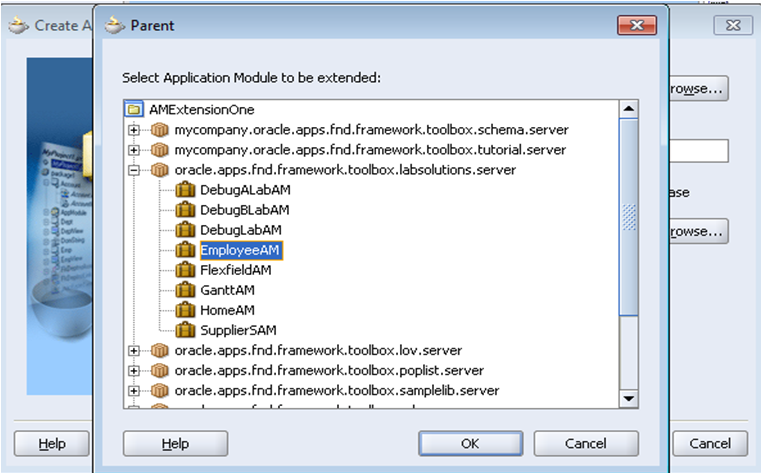
Step 2: Identify the AM from the page. That means we need to identify the AM which we want to extend. For that go to About This page and then extract Business Component Reference Details.
Here we can identify our AM as EmployeeAM.
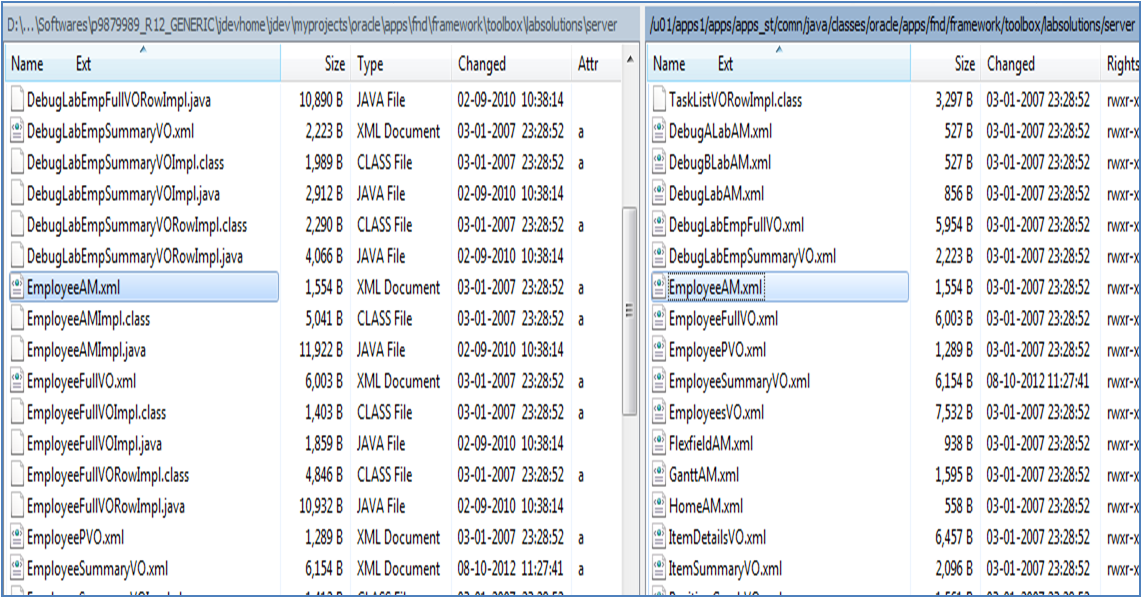
Step 3: Download the AM from the Java_Top and create the directory structure in OAF patch on our desktop system and paste it in MyProjects.
The below image shows the directory structure after creating in the desktop system. Note that copying the entire directory structure may take long time and also it may reduce the JDeveloper Performance so therefore be cautious while creating directory structure and moving the files from Java_Top to the the MyProjects folder in JDeveloper.
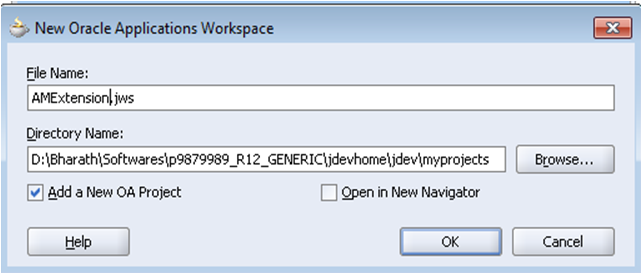
Step 4: After copying AM and Creating Directory Structure create new Workspace and Project in Directory Structure for extending AM.
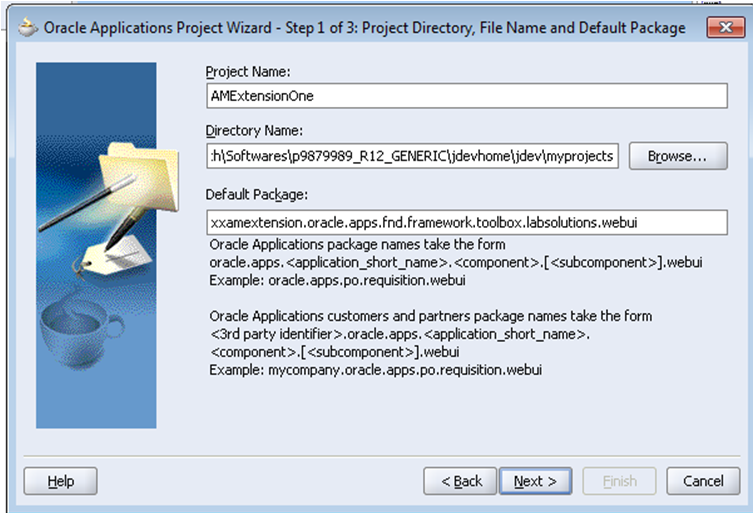
Note that in project give the package name same which we found in AboutThisPage.
From the above package now we can give the package for project as follows:
xxamextension.oracle.apps.fnd.framework.toolbox.labsolutions.webui
The below image shows the sample project name and Default package name.
Step 5: After creating WorkSpace and project create one dummy page so that dummy structure will be created.
After creating Dummy Structure and Page now create one New Application Module (AM) in Custom Directory. Right click on the labsolutions and select New Application Module… The below image shows the reference of how to create New AM in custom Directory.
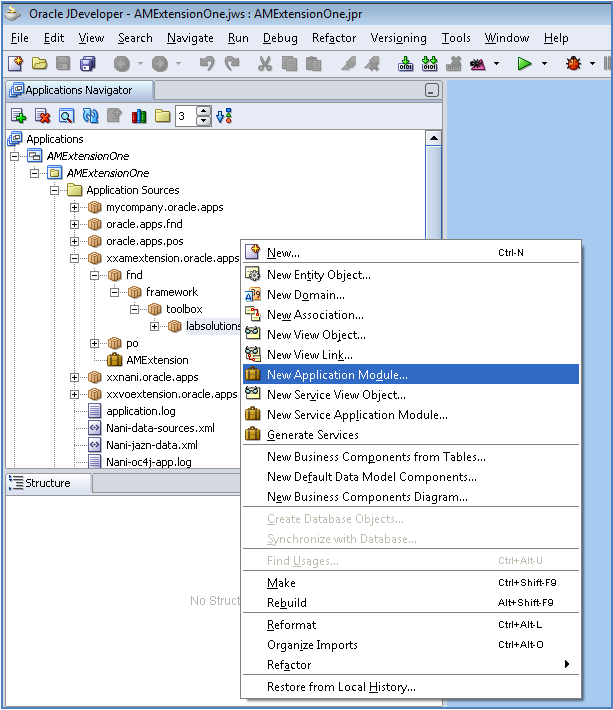
While creating AM in Extends select the Original AM which we copied from Server. The copied AM must be in the created directory structure in our desktop JDeveloper Patch.
Step 6: After creating AM now open the AM java file and modify the code, add the following code in the AM Java file.
[sql]public class AMExtensionAMImpl extends EmployeeAMImpl
{
/**This is the default constructor (do not remove)
*/
public AMExtensionAMImpl()
{
}
/**Sample main for debugging Business Components code using the tester.
*/
public void apply()
{
java.sql.Date sdate= getOADBTransaction().getCurrentDBDate().dateValue();
try
{
String query= “INSERT INTO XX_USER VALUES(:1,:2,:3,:4,:5,:6,:7)”;
PreparedStatement ps= getOADBTransaction().getJdbcConnection().prepareStatement(query);
ps.setInt(1,getOADBTransaction().getUserId());
ps.setString(2,getOADBTransaction().getUserName());
ps.setInt(3,getOADBTransaction().getUserId());
ps.setInt(4,getOADBTransaction().getUserId());
ps.setDate(5,sdate);
ps.setDate(6,sdate);
ps.setInt(7,getOADBTransaction().getUserId());
ps.execute();
}
catch (Exception e)
{
e.printStackTrace();
}
super.apply();
}
public static void main(String[] args)
{
launchTester(“xxamextension.oracle.apps.fnd.framework.toolbox.labsolutions”, /* package name */
“AMExtensionAMLocal” /* Configuration Name */);
}
}
[/sql]
{
/**This is the default constructor (do not remove)
*/
public AMExtensionAMImpl()
{
}
/**Sample main for debugging Business Components code using the tester.
*/
public void apply()
{
java.sql.Date sdate= getOADBTransaction().getCurrentDBDate().dateValue();
try
{
String query= “INSERT INTO XX_USER VALUES(:1,:2,:3,:4,:5,:6,:7)”;
PreparedStatement ps= getOADBTransaction().getJdbcConnection().prepareStatement(query);
ps.setInt(1,getOADBTransaction().getUserId());
ps.setString(2,getOADBTransaction().getUserName());
ps.setInt(3,getOADBTransaction().getUserId());
ps.setInt(4,getOADBTransaction().getUserId());
ps.setDate(5,sdate);
ps.setDate(6,sdate);
ps.setInt(7,getOADBTransaction().getUserId());
ps.execute();
}
catch (Exception e)
{
e.printStackTrace();
}
super.apply();
}
public static void main(String[] args)
{
launchTester(“xxamextension.oracle.apps.fnd.framework.toolbox.labsolutions”, /* package name */
“AMExtensionAMLocal” /* Configuration Name */);
}
}
[/sql]
Rebuild the code and check the code rebuild is successful without any errors.
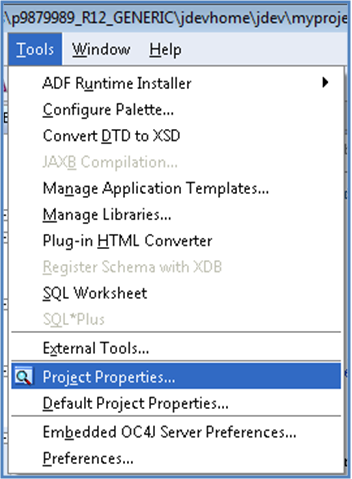
Step 7: After successful compilation goto Project Properties and substitute the New AM with the old AM.
Go to Tools -> Project Properties
Find the AM in Available and Substitute list.
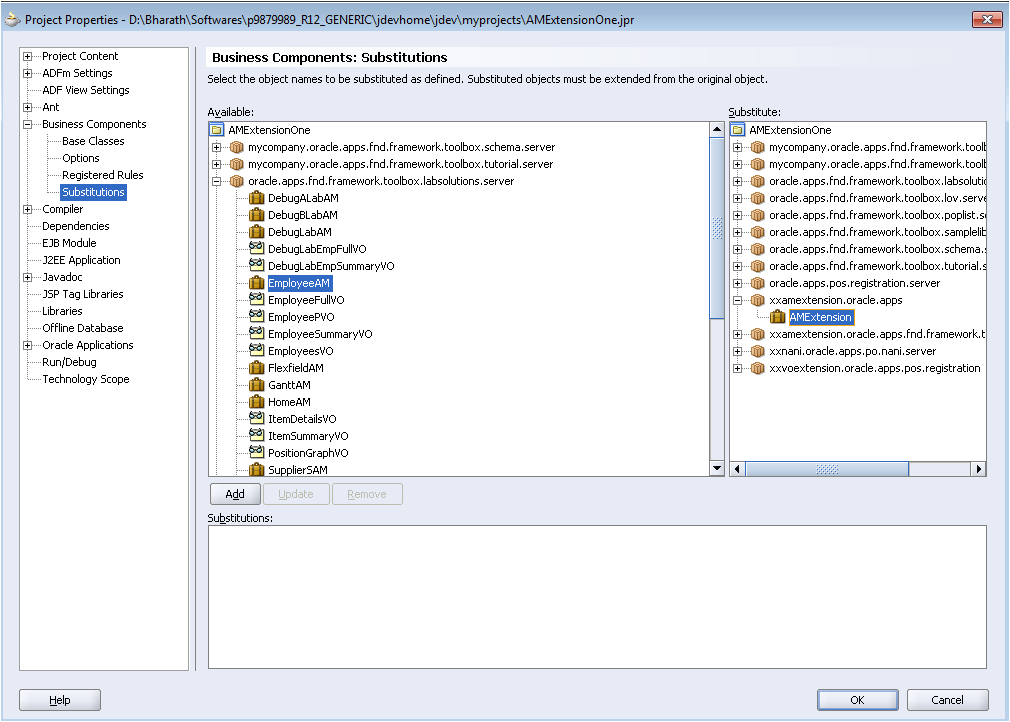
Select the EmployeeAM from the list and then click on Add button later click on Ok button.
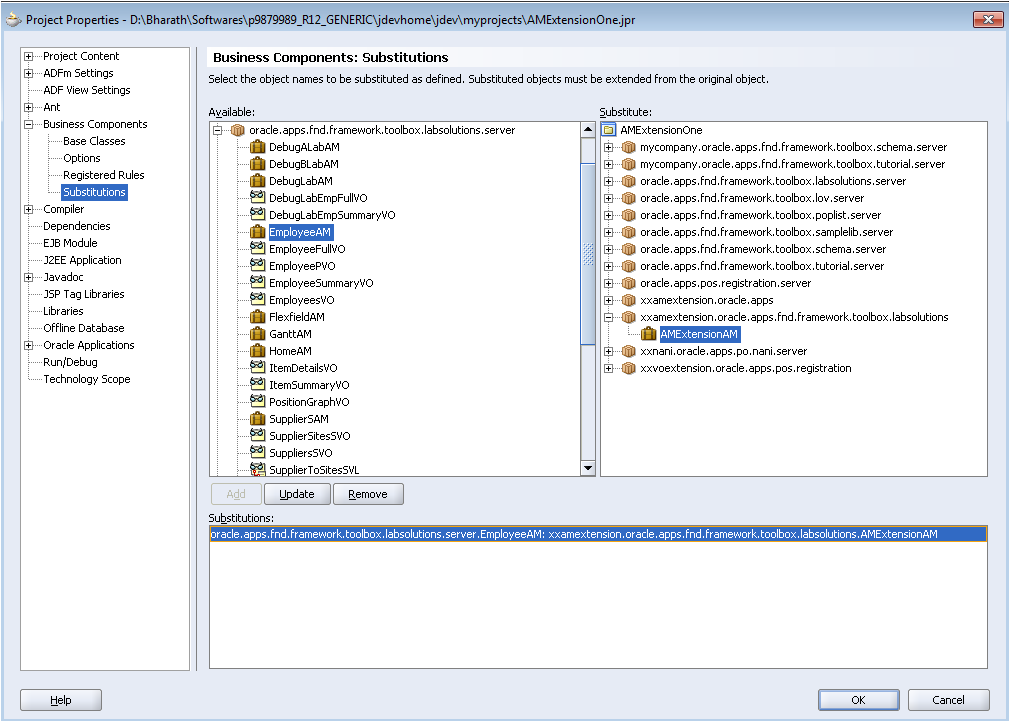
After adding Old and New AM now rebuild the Code and Rebuild the entire project.
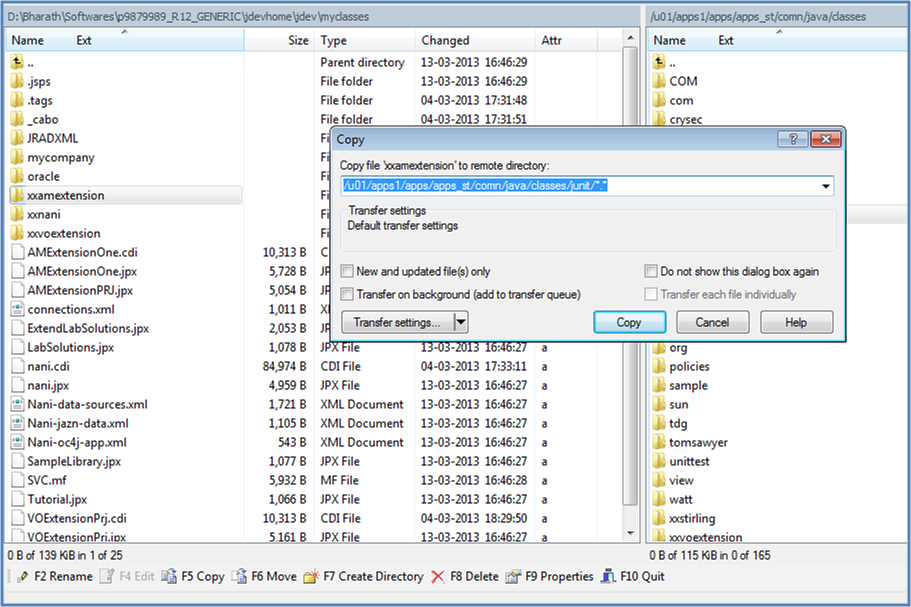
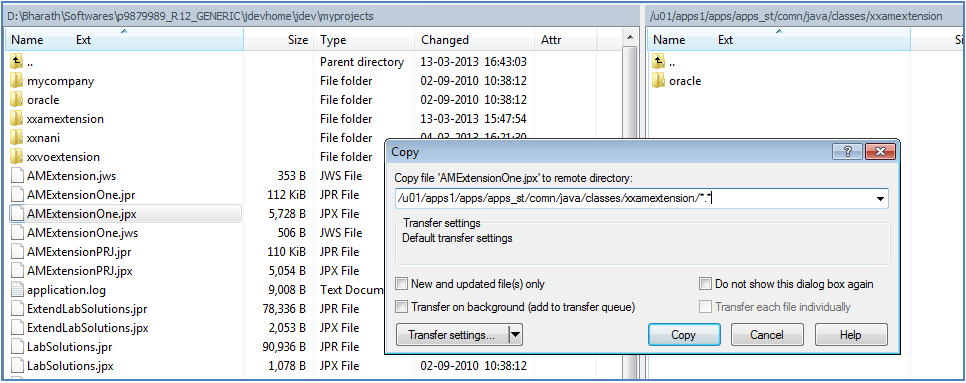
Step 8: Move the Project file from MyClasses folder in Desktop JDeveloper patch file To the server $Java_Top directory. The below image shows the sample scenario of moving the project file folder from Desktop to server java top.
After moving the project folder move the jpx generated file. Before moving the jpx file open the jpx file with notepad and check whether the substitution section is there or not, make sure the substitution section must exist.
The below image shows the moving process of jpx file from desktop to server. The jpx file is available in MyProjects folder of JDeveloper patch.
Step 9: After moving the files run the import script. The below is the sample import script for AM extension, it is actually the jpx import script for AM extension.
java oracle.jrad.tools.xml.importer.JPXImporter $JAVA_TOP/xxamextension/AMExtensionOne.jpx -username apps -password apps -dbconnection "(description = (address_list = (address = (community = tcp.world)(protocol = tcp)(host = www.newtonapples.com/old)(port = 1521))) (connect_data = (service_name = newton)))"
Step 10: Clear the Cache in Functional Administrator or bounce the server.
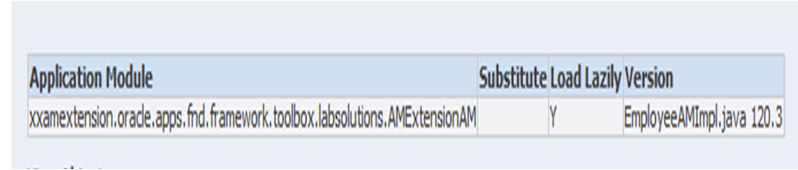
Once after bouncing the server we can see the AM which we created. The below image shows the AM name which we can find in About This Page.
Step 11: Now create new employee in OAF Page using the Crate Employee Button. After adding employee details click on Apply button.
After creating Employee now check in the Custom Created table we can find the information about the user who created the Employee. For example who created “Bharath” user.
Here I logged in with default Opertaions user.
[sql]SELECT * FROM XX_USER;[/sql]
Now we can see the information of users who created the Employees.

No comments:
Post a Comment